On this page
- What Plumbing Does a Bathroom Need?
- Which Pipe Is Best for Bathroom Plumbing?
- How Is a Bathroom Plumbing Layout Planned?
- What Are the Standard Rough-In Heights for Bathroom Fittings?
- How Is Plumbing Done in a Bathroom, Step by Step?
- How Do the Basin, WC and Shower Connect?
- Why Do Drain Slope, Traps and Vents Matter?
- What Are the Main Bathroom Fittings Names?
- How Much Does Bathroom Plumbing Cost?
- What Mistakes Cause Leaks and Rework?
- Bathroom plumbing is two separate systems: small pressurised supply pipes and large gravity drain pipes.
- Use CPVC or PPR for hot water, and SWR pipes for soil and waste. Plain UPVC is for cold water only.
- Choose your WC, basin and shower mixer before the plumber fixes the rough-in points.
- Pressure-test the supply and water-test the drains before waterproofing and tiling.
- Expect roughly ₹22,000–₹42,000 per bathroom for plumbing work, excluding sanitaryware and CP fittings.
Bathroom plumbing is the network of pipes, traps and fittings that brings clean water to your taps, shower and WC and carries used water away. In an Indian home it has two parts: pressurised hot and cold supply lines, and gravity-fed drainage with a vent.
This guide explains each part in plain terms, so you can read a plumbing drawing, check a material list and supervise the work.
What Plumbing Does a Bathroom Need?
A bathroom needs cold and hot water supply lines, a soil line from the WC, waste lines from the basin and shower, traps at every drain point and a vent to the open air.
- Supply side: water reaches the bathroom under pressure, from an overhead tank, a pressure pump or the municipal line. A geyser (wall-mounted water heater) feeds the hot line.
- Drainage side: used water flows downhill by gravity, through traps, into a vertical soil stack or an outside gully trap.
- Soil pipe vs waste pipe: the soil pipe carries WC discharge. The waste pipe carries water from the basin, shower and floor trap.
- Vent pipe: an open pipe that lets air into the drains, so water flows smoothly and sewer gas escapes above the roof.
Many Bengaluru homes store water in an underground sump and pump it to a terrace tank. That tank height decides your shower pressure, which matters when you pick fittings.
The trap holds a plug of water that blocks smell. The vent stops that water being sucked out. A smelly drain often means a dry or broken trap; a gurgling drain often means poor venting.
Which Pipe Is Best for Bathroom Plumbing?
CPVC is the default pipe for hot and cold bathroom supply in India, and SWR pipe is the default for drainage. PPR is a good alternative for supply, and plain UPVC suits cold water only.
Bathroom plumbing pipes compared
Confirm the current BIS edition| Pipe | Indian standard | Use in a bathroom | Hot water? | Jointing |
|---|---|---|---|---|
| CPVC Default pick | IS 15778 | Hot and cold supply, concealed or exposed | Yes | Solvent cement |
| PPR | IS 15801:2008 | Hot and cold supply | Yes | Heat fusion welding |
| UPVC (pressure) | IS 4985 | Cold supply from tank or mains | No | Solvent cement |
| SWR Drainage | IS 13592 (Type B for soil and waste) | WC soil line, basin and shower waste | Not a supply pipe | Rubber ring or solvent cement |
| GI Avoid for new work | IS 1239 (Part 1) | Older homes only | Yes | Threaded |
CPVC comes in pressure classes called SDR (the ratio of outside diameter to wall thickness). A lower SDR means a thicker wall: SDR 11 suits pumped or boosted supply, and SDR 13.5 often suits a gravity tank system.
Never let UPVC carry hot water. Check every length for the ISI mark, IS number and SDR class printed on the pipe, and reject unmarked or thin-walled stock.
Concealed pipes look neater but are hard to reach if they leak. Exposed pipes are cheaper and easy to repair, which suits rented homes and utility bathrooms.
How Is a Bathroom Plumbing Layout Planned?
A bathroom plumbing layout starts from the soil stack or shaft position, because the WC must sit close to it. The basin and shower then go along the same "wet wall" to keep pipe runs short.
- Locate the plumbing shaft (duct) or the outside stack and the main drain exit
- Fix the WC first, as near the stack as the room allows
- Group the basin, shower and WC on one or two adjacent walls
- Decide the geyser position close to the shower to cut hot-water wait
- Mark the floor trap at the lowest point, away from the door
- Choose Indian (squat) WC or EWC (European water closet, the Western commode) now, since the two need different drain positions
In an apartment, the builder's shaft and sunken slab usually fix where the WC and floor trap can go. Moving a WC far from the stack needs a longer, sloped soil line and often fails. Check your society rules before shifting fixtures.
A basic layout drawing shows each supply point (hot and cold in different colours), drain points, the floor trap, the stack and the floor slope arrows. Ask your plumber for one before work starts.
What Are the Standard Rough-In Heights for Bathroom Fittings?
Rough-in is the stage where pipes are laid inside walls and floors, with outlets left at set heights before tiling. Typical Indian heights put the basin inlets about 550 mm and the shower mixer about 1,050 mm above the finished floor.
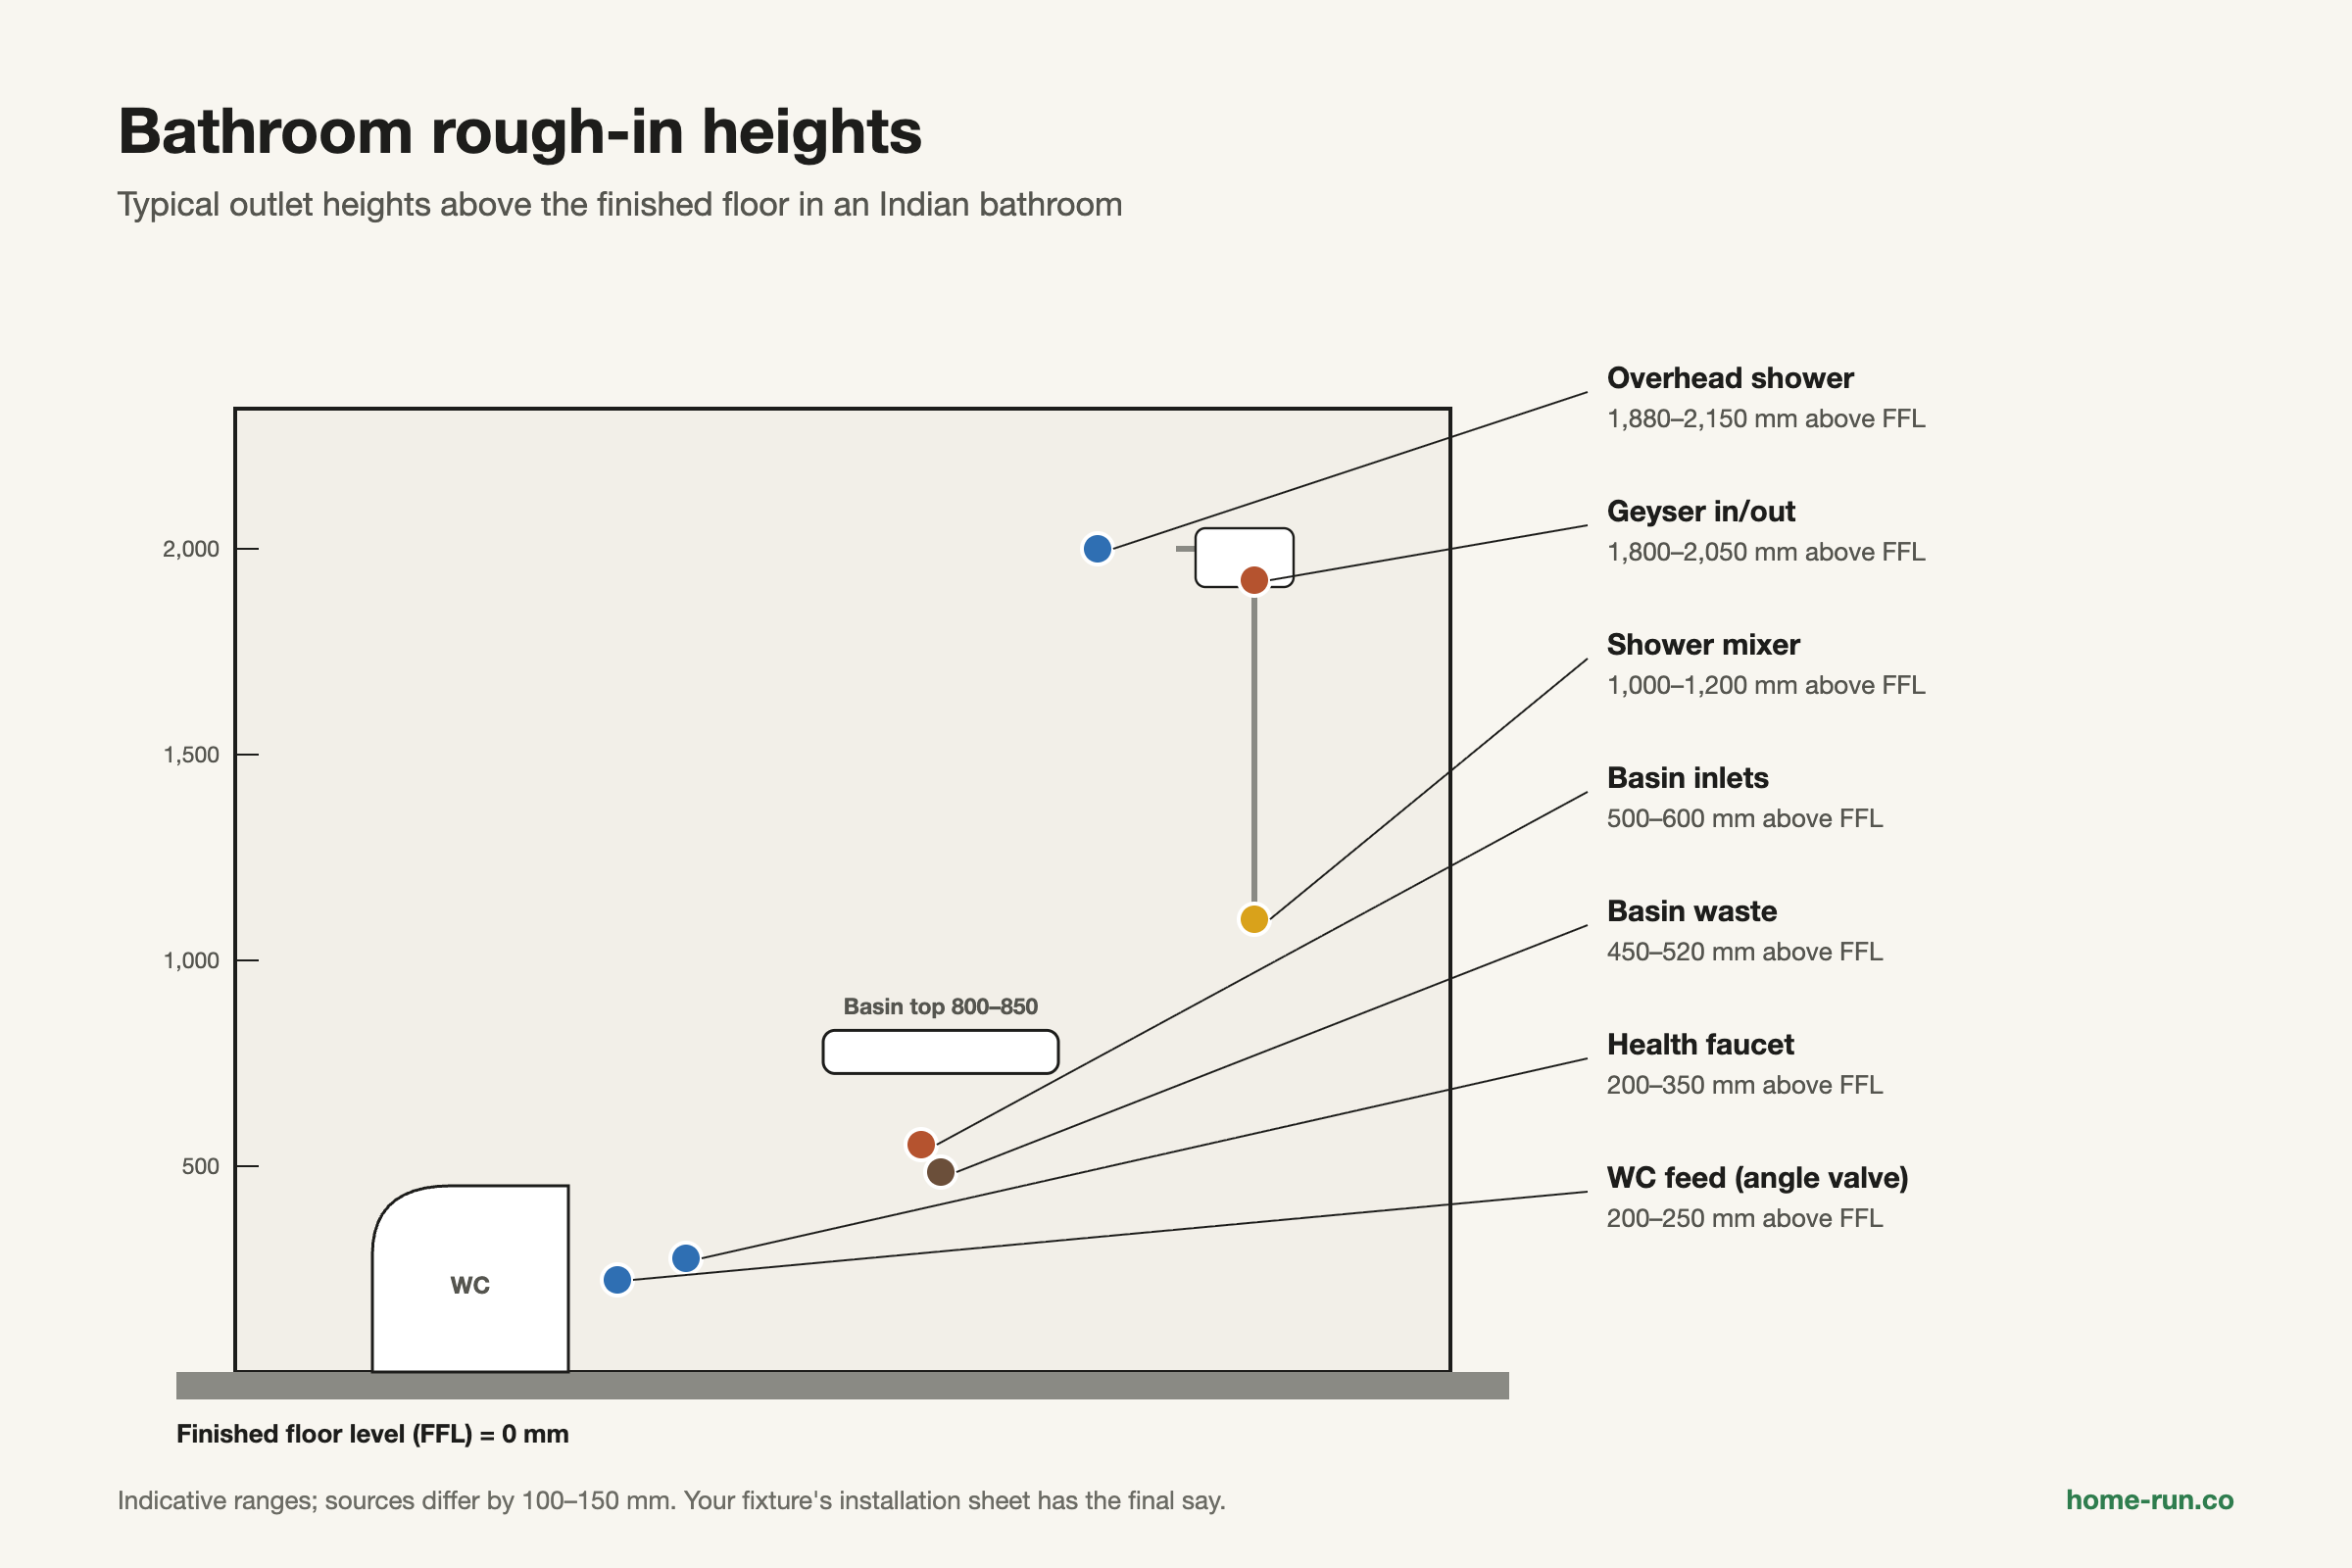
Indicative rough-in points for an Indian bathroom
mm from finished floor level (FFL)| Point | Typical height (mm) | Note |
|---|---|---|
| Health faucet | 200–350 | Beside the WC, on the wall side you prefer |
| WC or cistern feed (angle valve) | 200–250 | About 150 mm to one side of the pan centre |
| Concealed cistern flush plate | 1,000–1,150 | Follow the cistern frame sheet |
| Wash basin hot and cold inlets | 500–600 | Basin top usually 800–850 mm |
| Wash basin waste | 450–520 | Lower than the inlets |
| Shower mixer or diverter | 1,000–1,200 | Easy reach from standing |
| Overhead shower outlet | 1,880–2,150 | Rain showers sit at the upper end |
| Geyser inlet and outlet | 1,800–2,050 | Keep clear of the shower spray |
For the WC, an S-trap EWC (outlet through the floor) is sold to suit set wall-to-outlet distances, commonly 220 mm or 300 mm. A P-trap EWC (outlet into the wall) needs its drain at the model's outlet height, often about 180–230 mm.
A wall-hung WC, a concealed mixer and a floor-mounted EWC each need different outlets. If you buy fixtures after the rough-in, expect to break new tiles.
How Is Plumbing Done in a Bathroom, Step by Step?
Plumbing in a bathroom follows a fixed order: drainage first, supply second, tests before waterproofing, and fixtures last. Use this sequence to supervise an experienced plumber.
Mark the layout
Mark every point on the walls and floor from the drawing and the fixture sheets.
Chase walls and floor
Cut grooves only as deep as the pipe needs. Avoid deep chases in thin walls.
Lay drainage
Fix the soil line, waste lines and floor trap with a steady fall and long-radius bends.
Run supply lines
Lay hot and cold CPVC or PPR, with concealed valves and the diverter body in place.
Hold point: test
Pressure-test the supply and water-test the drains. Do not move on until both pass.
Waterproof and flood test
Waterproof the floor and wet walls, seal pipe sleeves, then pond water to check.
Tile, fix fittings, final check
Tile, install fixtures and CP fittings, then check every joint under flow.
Use the test pressure and duration that the pipe maker or your engineer specifies, since they vary by pipe type and class. Our bathroom waterproofing guide covers the membrane and flood-test step.
- Supply lines hold test pressure with no drop on the gauge
- Every drain point flows freely and no joint weeps
- Pipe sleeves through the slab are sealed into the waterproofing
- Concealed valves and the diverter can be reached later
- Photos of every wall are taken, with tape measurements, before tiling
How Do the Basin, WC and Shower Connect?
Each fixture has a supply connection, a trap and a waste or soil connection. Most leaks start at these joints, so they deserve a check after installation.
Wash basin
An angle valve (angle cock) on each supply point feeds the tap through a flexible connection pipe. Below, a waste coupling and a bottle or P-trap carry water into the wall or floor drain.
WC and health faucet
An exposed cistern or a concealed cistern behind the wall stores flush water. A flush valve is the alternative: it flushes direct from supply pressure, so it needs a larger pipe and strong pressure. The health faucet takes its own angle valve beside the pan.
Shower and bathtub
A diverter switches water between the overhead shower, hand shower and spout. Concealed diverters sit inside the wall, so fix the body at the right depth before tiling. See our guide to diverter valve types. A bathtub also needs a waste with an overflow.
- Dampness on the wall behind a basin: a loose flexible hose or angle valve
- Water around the WC base: a failed outlet seal or loose pan connector
- Damp patches below a shower wall: a leaking concealed diverter or poorly sealed sleeve
- Smell from the floor trap: a dry trap or a cracked trap body
Jaquar notes low-flow shower heads can work down to about 10 psi. Plan any pump before rough-in, because a pumped line suits the thicker SDR 11 CPVC.
Why Do Drain Slope, Traps and Vents Matter?
Drain slope, traps and vents decide whether a bathroom stays free of blockages and smell for decades. They sit under tiles, so mistakes here cost the most to fix.
- Slope: horizontal drains need a continuous fall. One Indian schedule suggests about 1 in 40 to 1 in 60 for a 100–110 mm soil line; the common US rule of ¼ inch per foot (about 1 in 48) falls inside that range. Too flat leaves standing water. Too steep lets water run ahead of solids.
- Bends: use long-radius bends or two 45° fittings instead of a sharp 90° elbow, which catches waste.
- Traps: every fixture needs one trap with a water seal of about 50 mm. Outside gully traps use a deeper 75 mm seal. Never fit two traps in series on one line.
- Vents: in multi-storey buildings the stack vents above the roof, so falling water does not suck traps dry.
- Access: leave a cleanout or inspection chamber where lines join, so a blockage can be rodded out without breaking tiles.
Confirm gradients and pipe sizes with your engineer against the National Building Code of India, Part 9 (Plumbing Services). In independent houses without a sewer line, the drains lead to a tank; see our septic tank design guide.
Typical bathroom drain and supply sizes
Indicative; confirm with your plumber| Connection | Typical size (mm) |
|---|---|
| Supply branch to a tap or mixer | 15–25 |
| Wash basin waste and trap | 32–40 |
| Shower and floor trap outlet | 50–75 |
| WC soil branch and stack | 100–110 |
| Outside gully trap | 100–150 |
What Are the Main Bathroom Fittings Names?
Bathroom fittings fall into two groups: CP (chrome-plated) fittings you see, such as taps and showers, and sanitaryware, such as the WC and basin. Pipe fittings and valves hide behind them.
Bathroom fittings names list
What to put on your material list| Group | Items | Where it goes |
|---|---|---|
| Taps and mixers | Pillar tap, basin mixer, wall mixer, bib tap | Basin, bucket point |
| Showers | Overhead shower, hand shower, shower arm, diverter | Shower area |
| Sanitaryware | EWC or Indian WC, wash basin, cistern | WC and basin wall |
| Valves | Angle valve, concealed stop valve, ball valve | Every supply point and the bathroom inlet |
| Drain parts | Floor trap (nahani trap), grating, waste coupling, bottle trap | Floor and under basin |
| Connectors | Flexible hose, health faucet, WC connector | Between pipe and fixture |
Put a main stop valve at the bathroom inlet so you can shut the room without shutting the house. Our explainer on the ball valve covers how a quarter-turn valve works.
For taps, a brass body with chrome plating is the common choice. Look for the ISI mark under IS 8931, the BIS standard for copper alloy taps and stop valves.
Plumbing a new bathroom?
Get ISI-marked pipes, fittings and bath fittings delivered across Bengaluru with a GST invoice.
How Much Does Bathroom Plumbing Cost?
Bathroom plumbing in India costs about ₹22,000–₹42,000 per bathroom in 2026 for pipes, fittings and labour, excluding sanitaryware and CP fittings. Two published guides give overlapping ranges.
Published bathroom plumbing cost ranges, 2026
India averages; get local quotes| Item | Range (₹) | Source and date |
|---|---|---|
| Per bathroom, new build | 22,000–38,000 | HouseYog, updated Mar 2026 |
| Per bathroom, standard rough-in Common | 28,000–42,000 | Studio Matrx, Jul 2026 |
| Gut re-plumb of an old bathroom | 35,000–60,000 | Studio Matrx, Jul 2026 |
| Labour per point | 360–800 | HouseYog, Mar 2026 |
| Labour per supply point, standard | 800–1,200 | Studio Matrx, Jul 2026 |
The quote rises with concealed piping, more points, a new soil stack, wall chasing and any tile breaking in a renovation. Ask for an itemised quote that lists material and labour separately, with the pipe brand, SDR class and number of points.
Jobs you can do yourself
DIYLow risk, no wall opening.
- Swap a tap or shower head on the same outlet
- Replace a flexible hose or health faucet
- Clean a floor trap or bottle trap
- Reseal silicone around a basin or WC base
Jobs for an experienced plumber
Hire a proHidden work that is costly to redo.
- Moving the WC or re-routing any drain
- New concealed supply lines or diverters
- Connections to the soil stack or vent
- Pressure testing before waterproofing
What Mistakes Cause Leaks and Rework?
The costliest bathroom mistakes are the ones buried under tiles: no test, the wrong pipe, poor slope and valves you cannot reach.
- Tiling before the supply pressure test and drain water test
- UPVC used on the geyser outlet or any hot line
- Flat or sagging drain runs, and sharp 90° elbows on the soil line
- Unsealed pipe sleeves through the waterproofing layer
- Concealed valves with no access plate or removable trim
- Fixtures bought after the rough-in was fixed
Your next step: finalise the fixtures, ask the plumber for a layout drawing with heights, and get an itemised quote before any wall is chased.