On this page
- What Is Bathroom Waterproofing, and Why Don't Tiles Stop Leaks?
- Which Bathroom Floor and Wall Areas Need Waterproofing?
- What Are the Types of Bathroom Waterproofing Materials?
- How Do You Waterproof a Bathroom Floor and Walls, Step by Step?
- How Much Waterproofing Material Do You Need?
- How Do You Test Bathroom Waterproofing Before Tiling?
- Can You Waterproof a Bathroom Without Removing the Tiles?
- What Does Bathroom Waterproofing Cost, and Is DIY Worth It?
- What Waterproofing Mistakes Should You Avoid?
- How Long Does Bathroom Waterproofing Last?
- Bathroom waterproofing is a membrane under the tiles; tiles and grout alone let water through.
- Cover the whole floor, all wall-floor joints, pipe and drain openings, and the shower walls.
- Flexible membranes suit bathrooms better than rigid cement coatings.
- Cure the membrane, then run a 24–48 hour ponding test before tiling.
Bathroom waterproofing is a continuous waterproof layer laid on the floor and wet walls before tiling. It stops shower and washing water from soaking into the slab, the brickwork and the ceiling of the room below.
What Is Bathroom Waterproofing, and Why Don't Tiles Stop Leaks?
Bathroom waterproofing creates a barrier between the tiles and the slab or wall plaster. Tiles shed most water, but they do not make a bathroom watertight.
- Grout is porous. Cement grout, the filler between tiles, soaks up water and cracks with age.
- Joints move. Wall-floor corners and pipe collars open up hairline gaps over time.
- Water spreads. Under the tiles, it moves through the screed (levelling mortar) and slab.
In apartments, the first sign is often a damp patch on the ceiling below, or dampness on the other side of the wall.
Tile adhesive is glue, and grout is a joint filler. Even epoxy grout only protects the joints. The membrane underneath does the waterproofing.
Which Bathroom Floor and Wall Areas Need Waterproofing?
Waterproof the whole bathroom floor plus every wall zone that gets wet, not just the shower corner.
- The full floor, including the sunken slab base and its side walls if the bathroom has one
- All wall-floor junctions, with a rounded mortar fillet (coving) in each corner
- Walls outside the shower, turned up at least 300 mm from the floor
- Shower walls, to at least 1,800 mm above the shower floor
- Splash zones near the shower, to at least 1,000 mm above the floor
- The wall behind the washbasin, to at least 300 mm above the basin
- Every pipe penetration, the floor trap (drain) collar and the area around taps
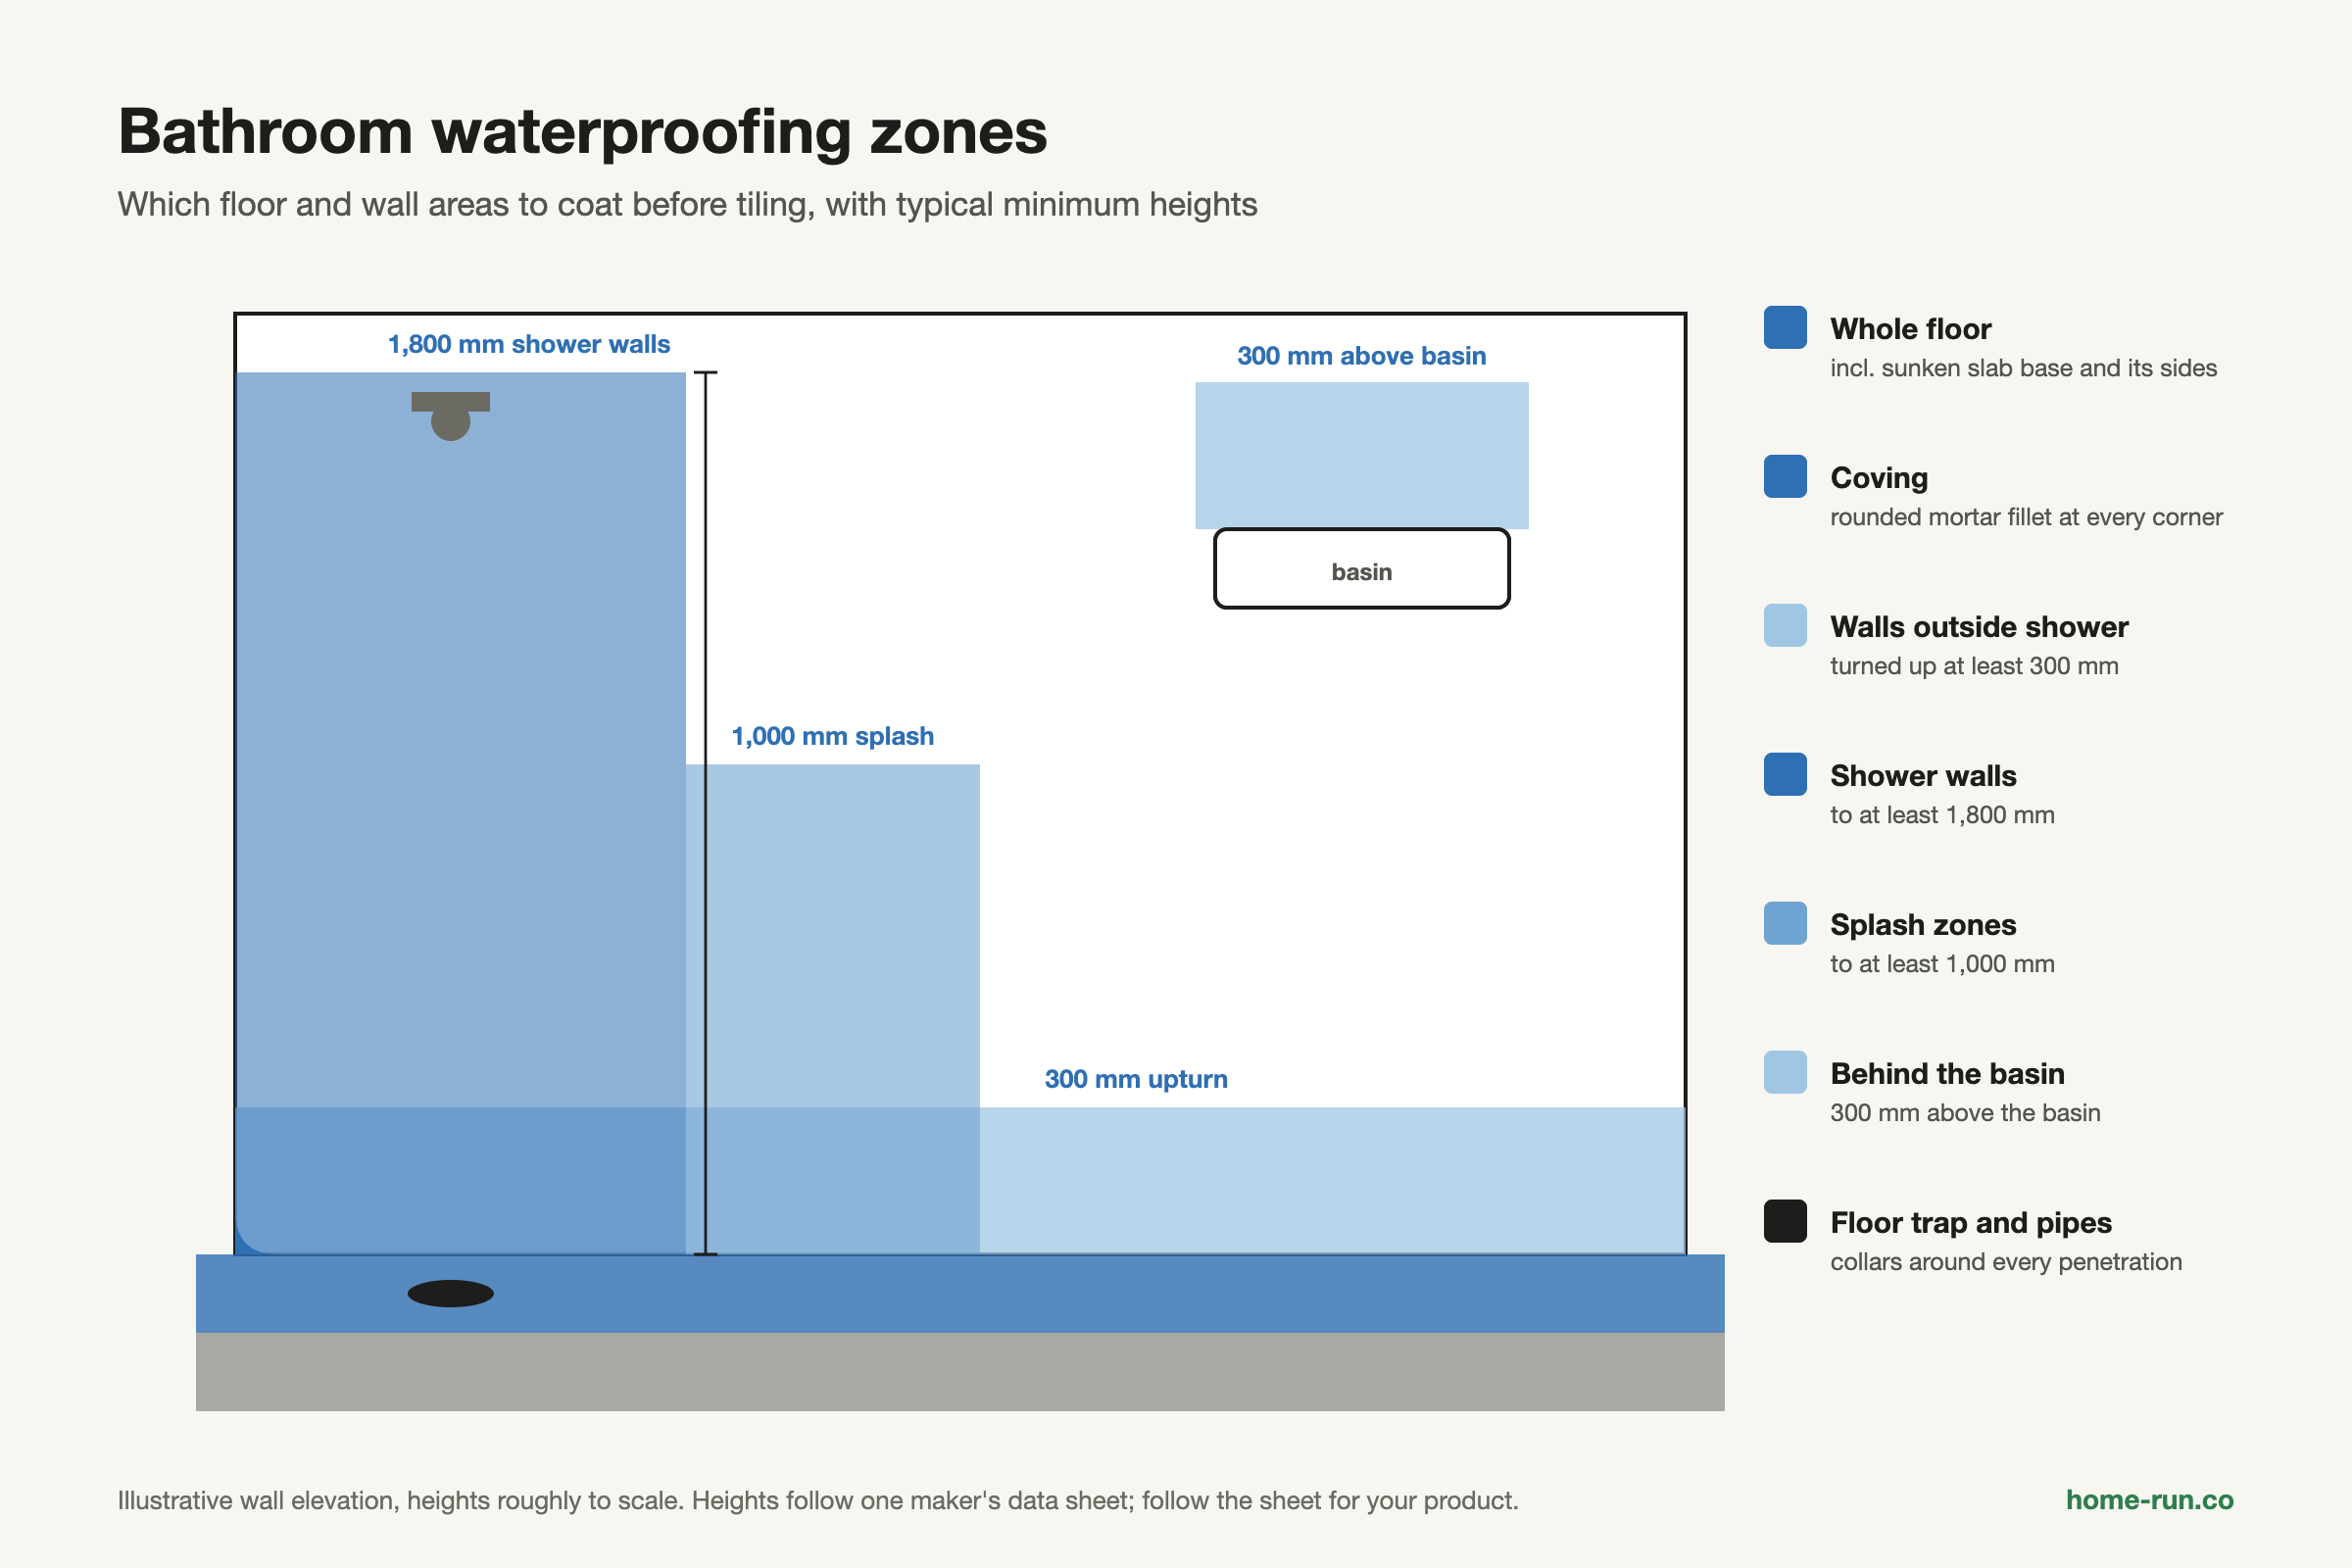
The 1,800 mm, 1,000 mm and basin heights come from the Dr. Fixit Bathseal Select data sheet. Follow the sheet for the product you buy.
What Are the Types of Bathroom Waterproofing Materials?
The main bathroom waterproofing materials are cement-based coatings, flexible polymer coatings, liquid membranes, sheet membranes and crystalline admixtures. Flexibility matters most, because floors and corners move slightly over time.
Bathroom waterproofing materials compared
Qualitative; check each product's data sheet| Material | Flexibility | Best use | Watch-out |
|---|---|---|---|
| Plain cementitious coating | Rigid | Stable slabs on a tight budget | Cracks if the slab or joints move |
| Polymer-modified cementitious (2-component) Default pick | Moderate (Pidifin 2K: 50% minimum elongation) | Floors, sunken slabs and walls in new builds | Short pot life once mixed |
| Liquid acrylic membrane (1-component) | High (Bathseal Select: 300% or more) | Under-tile wet areas, renovations | Needs at least 5 days of air cure |
| Polyurethane (PU) liquid | Very high, rubbery | Movement-prone slabs, premium jobs | Needs a dry surface; costs most |
| Sheet membrane | High | Fast installs with even thickness | Laps need careful detailing |
| Crystalline admixture Support only | Inside the concrete | Added to the slab concrete at casting | Does not replace an under-tile membrane |
How Do You Waterproof a Bathroom Floor and Walls, Step by Step?
You waterproof a bathroom in eight steps. Coat gaps and cure times vary by product, so keep the data sheet on site.
- Prepare the surface. Clean off dust, oil and loose plaster. Repair cracks and honeycombing (voids in concrete) with polymer-modified mortar.
- Form the coving. Build a rounded cement-sand fillet at every wall-floor and wall-wall corner.
- Seal pipe and drain openings. Pack gaps around pipe sleeves and the floor trap with non-shrink mortar or sealant.
- Prime if required. Bathseal Select, for example, uses a first coat diluted 1:1 with water as its primer.
- Reinforce weak points. Embed joint tape or fibre mesh in a wet coat at corners, drain flanges and pipe collars.
- Apply two full coats. Lay the second coat at right angles to the first, 3–4 hours apart for Bathseal Select or 6–8 hours for Pidifin 2K.
- Cure and test. Air-cure, then run the ponding test.
- Protect and tile. Lay a protective screed sloped to the drain, then fix tiles with a polymer tile adhesive.
For a sunken slab, waterproof and pond-test the base and side walls before filling. After screeding, waterproof the top again as a second line of defence.
How Much Waterproofing Material Do You Need?
Material needed equals the area to coat times the consumption rate, plus about 10% wastage.
With Pidifin 2K (a 3 kg kit covers 1.65–1.7 sq m), the same area needs about 4.7 kits, or roughly 14 kg.
How Do You Test Bathroom Waterproofing Before Tiling?
You test bathroom waterproofing with a ponding test: plug the drain, flood the cured floor with water and watch for leaks for 24–48 hours. Do the test only after the membrane has fully cured.
Apply both coats
Leave the product's gap between coat one and coat two.
Air cure
Pidifin 2K needs 3–5 days; Bathseal Select at least 5. Do not cure by flooding.
Ponding test
Plug the trap, bund the doorway, fill to 25–50 mm and mark the level.
Screed and tile
Drain the water, lay the protective screed and start tiling.
A pass means the level holds and no damp appears below or outside. A falling level or new damp patch is a fail: repair and test again.
A leak found after tiling means breaking new tiles. A two-day test costs far less than re-tiling.
Can You Waterproof a Bathroom Without Removing the Tiles?
Yes, for small leaks from joints, but a full redo under new tiles is more reliable. Choose based on where the water is getting in.
Repair without removing tiles
Small leaksRegrouting, sealing, clear coats or injection.
- Fixes leaks from worn grout and gaps
- Little dust, done in a day or two
- Cannot fix a failed membrane
- Results vary; ask for a written warranty
Strip and redo
Safer long termRemove tiles and screed, then start fresh.
- Fixes the barrier, not the symptom
- Lets you correct slope and pipe joints
- Takes about one to two weeks
- Best for hollow tiles or ceiling damp
Rule out a cracked concealed pipe first. In Bengaluru, Dr. Fixit suggests February to May for coating work, when surfaces dry well.
What Does Bathroom Waterproofing Cost, and Is DIY Worth It?
Bathroom waterproofing in India costs about ₹55–260 per sq ft applied, depending on the system. For the 7.79 sq m (84 sq ft) example above, a liquid acrylic system works out to roughly ₹5,000–11,000.
Indicative applied cost by system
₹ per sq ft, material + labour, July 2026| System | Material | Labour | Applied |
|---|---|---|---|
| Cementitious (2-component) | 30–70 | 20–40 | 55–110 |
| Liquid acrylic Common choice | 40–90 | 20–45 | 60–130 |
| Polyurethane (PU) | 90–180 | 40–80 | 130–260 |
| Sheet membrane | 60–130 | 40–70 | 100–200 |
Cost rises with wall height coated, sunken slab work, crack repair and a certified applicator. Repairs in a finished bathroom cost more because of demolition and re-tiling.
DIY suits a small, new, dry bathroom if you follow the data sheet exactly. Hire a professional for sunken slabs, active leaks or apartments, and ask for the product name, a ponding test and a written warranty.
Waterproofing a bathroom?
Waterproofing chemicals, adhesive and grout delivered across Bengaluru.
What Waterproofing Mistakes Should You Avoid?
Most bathroom waterproofing failures come from skipped details, not the wrong brand. Watch for these signs.
- Coating applied on a dusty, wet or cracked surface
- No coving at wall-floor corners, or a thin coat there
- Gaps left around pipe collars and the floor trap
- Membrane stopping short of the shower wall height
- Only one coat, or pinholes visible in the dried film
- Tiling started before the cure time or with no ponding test
- Screed with no slope, so water pools away from the drain
If water is already reaching other rooms, our guide to water seepage causes and solutions helps you trace the source.
How Long Does Bathroom Waterproofing Last?
Bathroom waterproofing lasts as long as the membrane stays unbroken. That depends on the material, workmanship and structural movement, so rely on a written warranty, not a general figure.
- Regrout worn or cracked joints before water gets under the tiles.
- Reseal around taps, the WC base and floor trap.
- Fix dripping taps and slow drains early.
Next step: pick the membrane, measure your area and get a site assessment or price list.