On this page
- What Is a Wall Putty Design, and How Is It Different from Plain Putty?
- Which Wall Putty Design Ideas Are Popular in Indian Homes?
- Which Wall Putty Design Suits Each Room?
- Which Putty Type Is Best for a Wall Putty Design?
- Which Texture Suits Your Wall Condition and Climate?
- How Much Does a Wall Putty Design Cost per Sq Ft?
- How Much Putty Do You Need for a Textured Wall?
- How Do You Apply a Wall Putty Design Step by Step?
- What Wall Putty Defects Happen, and How Do You Fix Them?
- Should You Texture a Wall Yourself or Hire a Painter?
- How Do You Clean and Repaint a Textured Putty Wall?
- How Does Wall Putty Design Compare with Texture Paint, Wallpaper, Panels and POP?
- How Do You Plan Your Textured Wall?
- A wall putty design is a textured or patterned putty finish that is painted over.
- Pick one accent wall for deep textures; keep other walls smooth.
- Acrylic putty suits interior design work; cement putty handles exteriors.
- Fix cracks and damp first; texture will not hide a wall that keeps failing.
- Texture quotes in Bengaluru vary widely, so compare written quotes per sq ft.
A wall putty design is a decorative finish made by working wet putty into a texture or pattern, then priming and painting it. The same putty that normally sits flat under paint becomes the design itself.
This guide lists ten wall putty design ideas and shows where each one works. It also covers putty types, costs and the full application method.
What Is a Wall Putty Design, and How Is It Different from Plain Putty?
Plain wall putty is a thin levelling coat that fills pores and small dents before paint. You never see it once the wall is painted.
A wall putty design uses the same material in a thicker, tooled layer. Painters swirl, comb, dab or drag the wet putty to leave a pattern you can see and feel.
- Plain putty finish: flat, smooth base for paint.
- Putty texture design: a hand-made pattern in putty, painted afterwards.
- Texture paint: a ready-made thick paint that creates texture in one product.
- Wallpaper: a printed sheet pasted on the wall, with no relief from putty.
Any good putty can carry a texture. The tool, the wrist movement and the coat thickness create the design. That is why one brand of putty can give ten different looks.
Which Wall Putty Design Ideas Are Popular in Indian Homes?
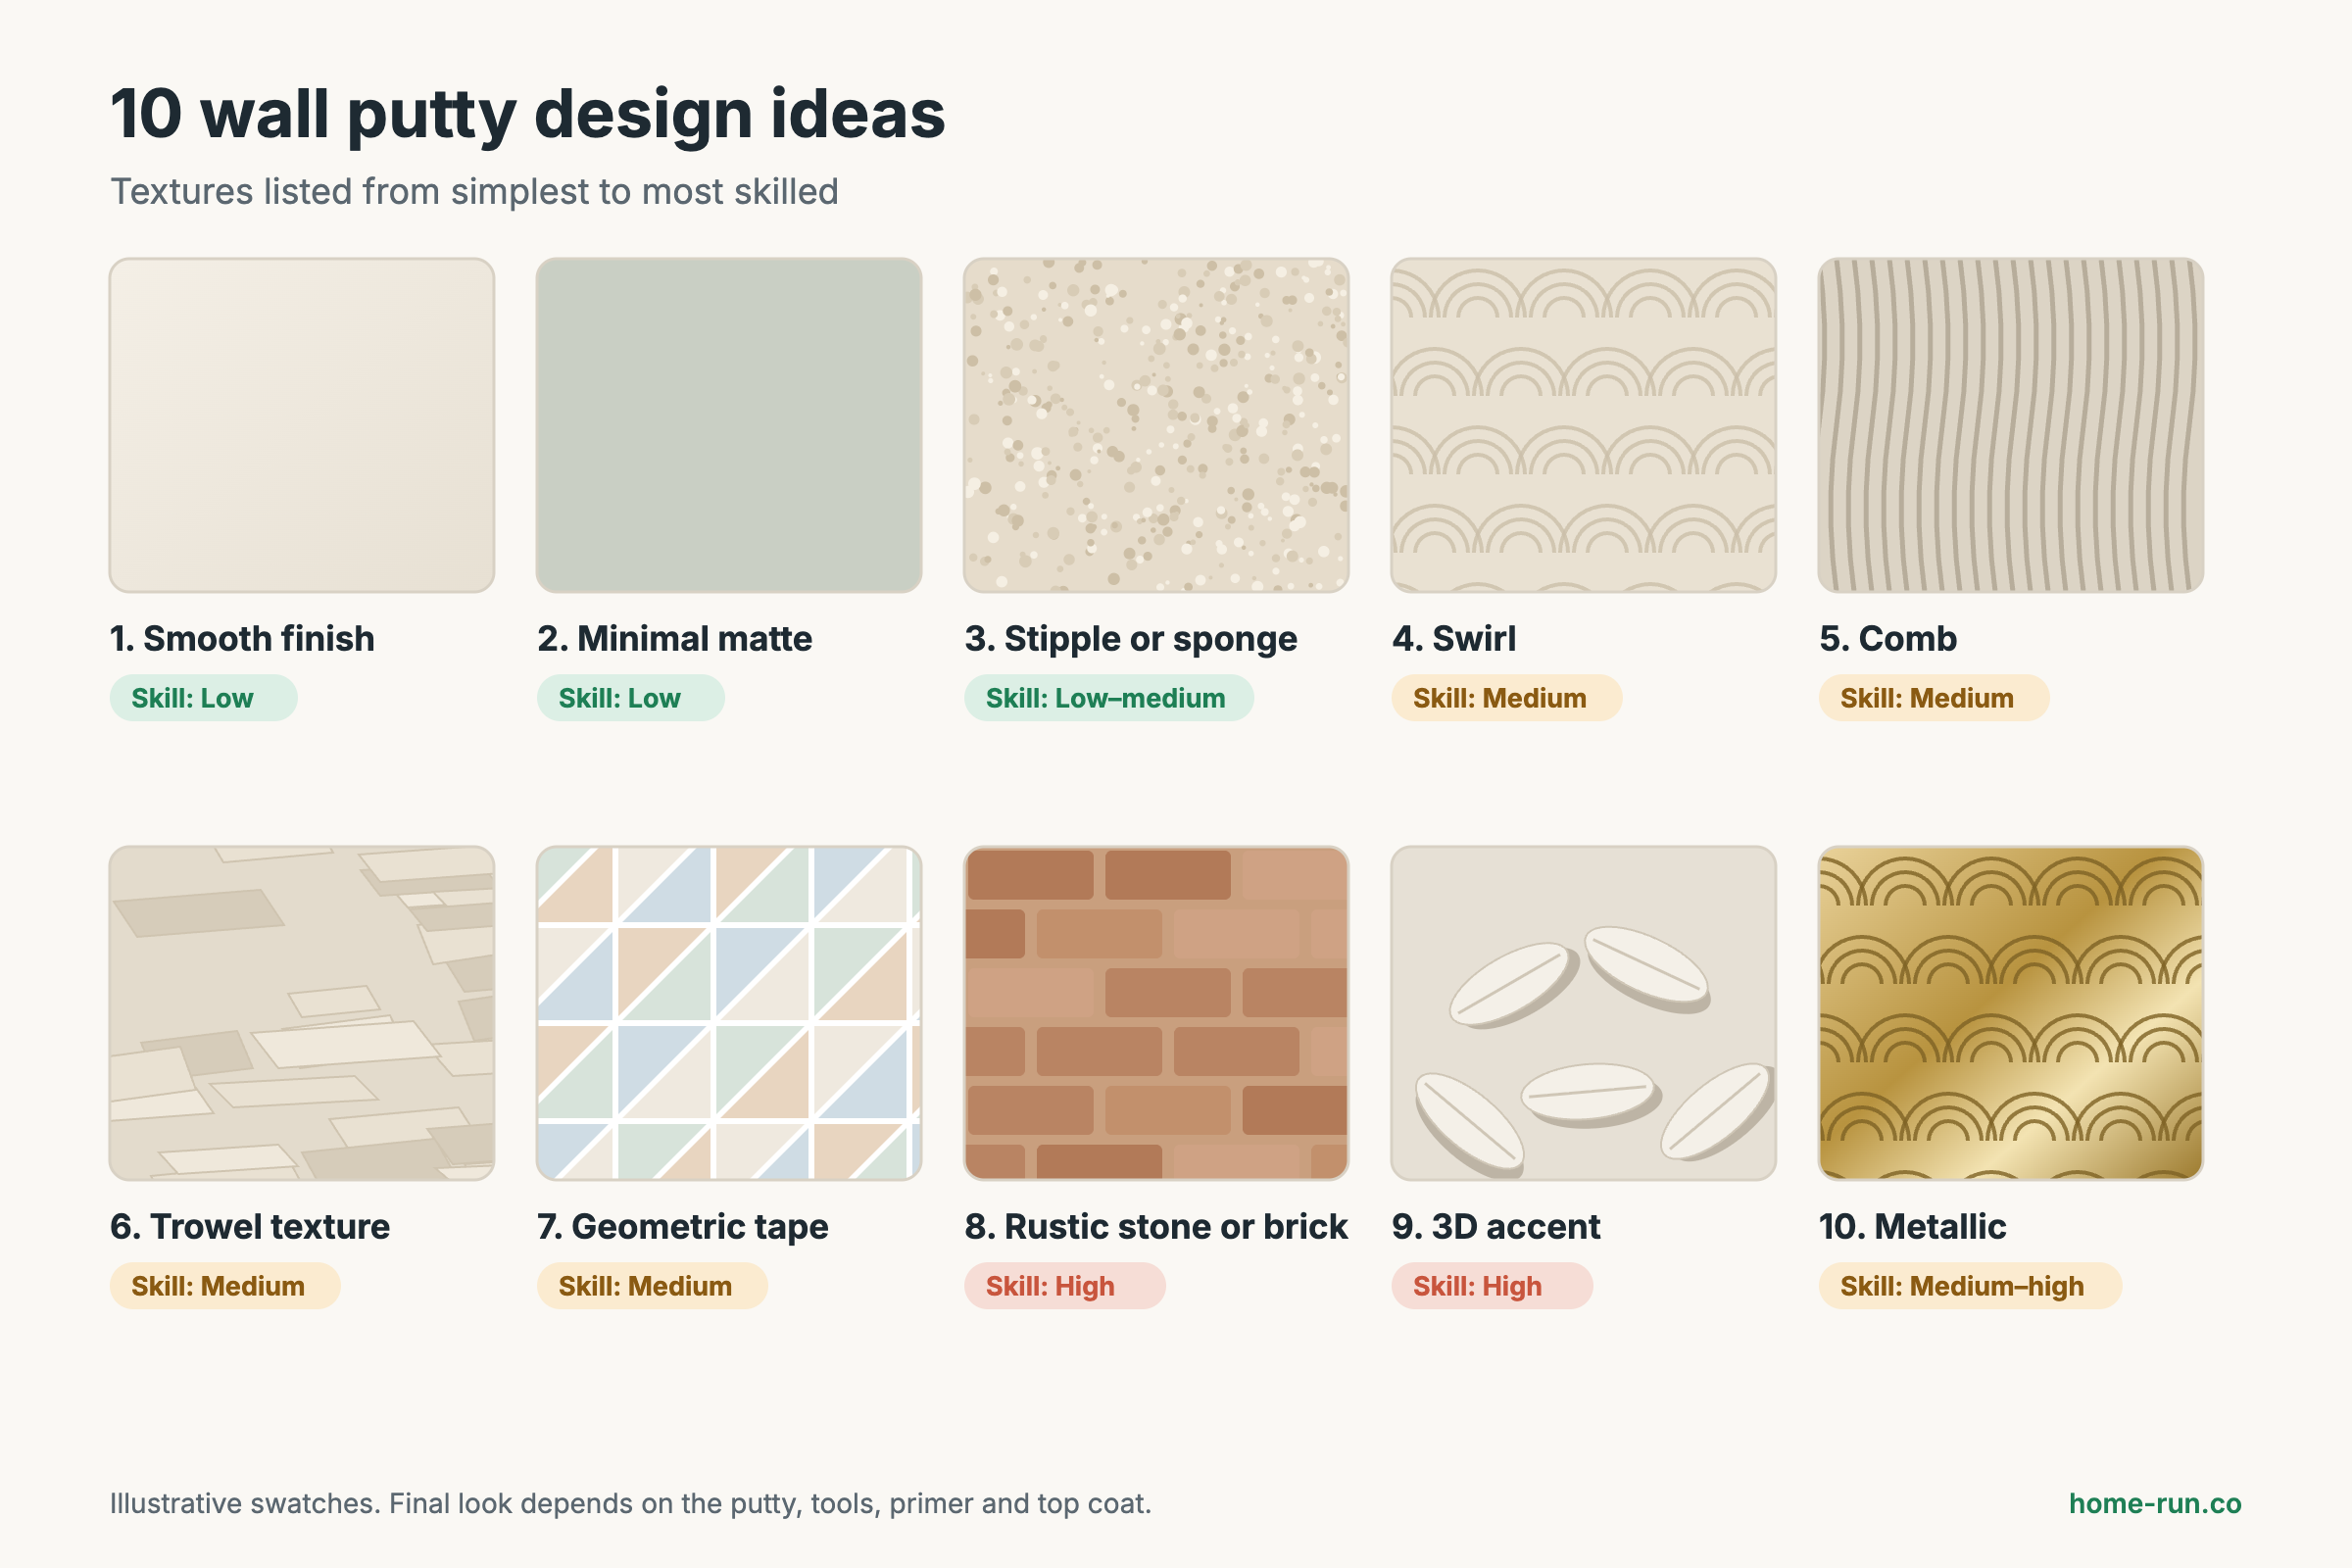
The ten most common wall putty design ideas range from a mirror-smooth finish to deep 3D relief. They are listed here from simplest to most skilled.
1. Smooth, joint-free finish
A smooth putty finish is two thin coats sanded flat, with no visible pattern. It suits every room and gives paint its best colour. Effort is low, and most painters do it as standard.
2. Minimal matte wall
A minimal matte wall is a smooth putty base finished in flat matte paint. It hides small surface waves well. It works in modern flats where furniture and art carry the style.
3. Stipple or sponge texture
A stipple texture is made by dabbing wet putty with a sponge or stiff brush. It leaves small peaks across the wall. It is easy to learn and good at hiding uneven plaster.
4. Swirl or fan pattern
A swirl pattern is made by turning a putty knife or brush in arcs across wet putty. It is one of the most searched "panch" style designs. Keep the arcs the same size for an even look.
5. Comb or line texture
A comb texture is made by dragging a notched trowel or comb through the wet coat. Straight lines look modern; wavy lines look softer. Vertical lines make a low ceiling feel taller.
6. Rough sand or trowel texture
A trowel texture uses a steel trowel skimmed at a low angle to leave broad, flat ridges. It suits large hall walls and front elevations. Done with exterior-rated putty, it also works outdoors.
7. Geometric tape design
A geometric putty design uses masking tape to mark triangles, stripes or diamonds. You texture or colour between the tapes, then peel them off while the coat is still soft. It needs careful measuring more than artistic skill.
8. Rustic stone or brick effect
A rustic putty design copies stone, brick or old plaster with thick, uneven layers. Brick lines are cut into the wet coat with a blunt tool. Earthy colours such as terracotta and ochre finish the look.
9. 3D accent wall
A 3D wall putty design builds raised shapes, such as leaves, waves or flowers, in several layers. It is the most skilled design on this list. Keep it to one wall behind a bed or TV unit.
10. Metallic finish over texture
A metallic putty design is any texture finished with a metallic paint, such as silver, gold or bronze. The sheen catches light on the peaks of the pattern. Use it on one feature area, not a whole room.
Wall putty design ideas compared
Simplest first| Design | Skill needed | Main tool | Upkeep |
|---|---|---|---|
| Smooth finish Default pick | Low | Putty knife, sandpaper | Easy to wipe |
| Minimal matte | Low | Putty knife, roller | Marks show on flat paint |
| Stipple or sponge | Low to medium | Sponge, stiff brush | Dust settles in peaks |
| Swirl | Medium | Putty knife, brush | Soft brush dusting |
| Comb | Medium | Notched trowel or comb | Dust in grooves |
| Trowel texture | Medium | Steel trowel | Easy |
| Geometric tape | Medium | Masking tape, knife | Easy |
| Rustic stone or brick | High | Trowel, blunt cutter | Dust in joints |
| 3D accent Pro only | High | Knives, spatulas | Hard to repair |
| Metallic | Medium to high | Brush or roller for top coat | Shows fingerprints |
Which Wall Putty Design Suits Each Room?
The best wall putty design for a room depends on traffic, moisture and light. Use one strong design per room and keep the rest simple.
Wall putty design by room
One pick, one alternative| Room | Best pick | Alternative | Watch out |
|---|---|---|---|
| Living room and hall | 3D or geometric accent wall | Trowel texture | Keep other walls smooth |
| Bedroom | Soft swirl or stipple behind the bed | Minimal matte | Avoid sharp, high relief near the bed |
| Kids' room | Geometric tape design | Smooth finish, washable paint | Deep textures trap crayon and dust |
| Foyer and corridor | Trowel or comb texture | Stipple | Choose shallow relief in narrow spaces |
| Kitchen and dining | Smooth finish | Light comb on a dining wall | Grease collects in deep grooves |
| Bathroom | Tiles, not putty texture | Smooth finish on dry walls only | Constant moisture |
| Ceiling | Smooth or light stipple | Simple border pattern | Heavy relief is hard to apply overhead |
Side light from a window or wall lamp makes relief look deeper. Use deep textures where light falls across the wall, and shallow ones in narrow or dim passages.
In a rented flat or small home, one subtle textured wall gives the most effect for the money. It is also the easiest to repaint when you move out.
Which Putty Type Is Best for a Wall Putty Design?
Acrylic putty is usually best for interior design work, and cement-based putty is the choice for exterior walls. Gypsum putty suits dry interior walls only.
Acrylic vs cement-based vs gypsum-based putty
From manufacturer data sheets| Feature | Acrylic putty | Cement-based putty | Gypsum-based putty |
|---|---|---|---|
| Form | Ready-mixed paste | White cement powder, mixed with water | Fine powder, mixed with water |
| Where to use | Interior walls | Interior and exterior walls | Dry interior walls |
| Coverage, 2 coats | 24–35 sq ft/kg | 10–20 sq ft/kg | Check the bag |
| Recoat time | 4–6 hours | About 4 hours | About 4–5 hours |
| Damp tolerance | Interior only | Better; water-resistant grades exist | Poor, avoid damp walls |
| Choose it if | You want a fine indoor texture Interior pick | The wall is outside or near damp Exterior pick | The wall is gypsum plastered and dry |
White cement-based putty in India is covered by IS 17545:2021, the Bureau of Indian Standards specification for white cement based polymeric putty. Read more on the base material in our guide to white cement composition and properties.
Use a primer between putty and paint. JSW advises priming within 24–48 hours of the last putty coat. Primer evens out absorption, so the paint colour looks the same on peaks and grooves.
Which Texture Suits Your Wall Condition and Climate?
A sound, dry wall can take any design; a cracked or damp wall needs repair before any texture. Texture hides small flaws, but moving cracks and damp come back through it.
- New plaster: wait 28 days for curing, then any design works.
- Old painted wall: scrape loose paint and sand gloss; light textures stick best.
- Hairline cracks: fill and seal first; stipple and trowel textures hide repairs well.
- Damp or seepage walls: find and stop the water source first. See how to fix damp patches on walls before painting.
- Exterior and front elevation: use only putty rated for exterior use; Birla White, for example, rates only its Exterior Putty for outdoor walls.
JSW's data sheet says not to apply its putty when humidity is above 90%, or below 10°C or above 45°C. On wet monsoon days, coats dry slowly, so plan texture work for dry spells.
How Much Does a Wall Putty Design Cost per Sq Ft?
A wall putty design in Bengaluru usually costs several times more than plain putty. Published 2025–26 rates range from about ₹35 to over ₹250 per sq ft, depending on the design.
Indicative wall finish rates
₹ per sq ft of wall area| Finish | What it covers | ₹ per sq ft |
|---|---|---|
| Plain putty, 2 coats | Material and labour, India average | ₹8–13 |
| Plain putty, tier-1 metro | Average for cities such as Bengaluru | ₹10–15 |
| Basic paint, Bengaluru | Normal finish | ₹12–18 |
| Premium emulsion, Bengaluru | Premium paint | ₹18–30 |
| Luxury or texture, Bengaluru Source A | Texture finish band | ₹35–80+ |
| Texture, Bengaluru Source B | All textures, labour and materials | ₹70–250+ |
| Metallic texture, Bengaluru | Metallic finish | ₹100–150 |
These factors push a quote up or down:
- Design complexity: 3D and rustic work take far longer than stipple.
- Wall condition: crack repair and scraping add labour.
- Number of coats: deep textures need more putty and time.
- Brand and paint: metallic and premium top coats cost more.
- Wall height and access: double-height halls need scaffolding.
How Much Putty Do You Need for a Textured Wall?
You need wall area divided by the putty's coverage per kg for the number of coats. Take coverage from your product's data sheet.
Coverage uses JSW's 10–20 sq ft per kg for 2 coats. Rough plaster lands at the low end.
How Do You Apply a Wall Putty Design Step by Step?
You apply a wall putty design in seven stages: prepare, prime if needed, base coat, pattern coat, dry, sand lightly and paint.
- Prepare the wall: scrape loose paint, fill cracks and dust the surface. Wet cement-based surfaces lightly if the data sheet asks for it.
- Prime where needed: some brands ask for a primer before putty on old or chalky walls.
- Base coat: spread a thin, even putty coat with a putty knife and let it dry.
- Pattern coat: apply a thicker second coat and tool the design while it is wet. Work in small areas so the edge stays wet.
- Dry fully: follow the recoat time on the sheet, such as 4–6 hours for TruCare Acrylic.
- Sand lightly: knock off sharp peaks only, with fine sandpaper such as 180 grit.
- Prime and paint: apply primer, then two coats of emulsion or a metallic top coat.
Pattern notes for the main designs:
- Swirl: hold the knife at a low angle and turn your wrist in same-size arcs.
- Stipple: press and lift a damp sponge; turn it often so the marks do not repeat.
- Comb: pull the notched trowel in one steady stroke from top to bottom.
- Geometric: fix the tape first, texture between lines, and peel before the coat sets.
For paint choice over texture, matte hides marks, satin wipes clean and metallic adds sheen. Our home painting tips cover sheen levels in more detail.
What Wall Putty Defects Happen, and How Do You Fix Them?
The four common putty defects are cracks, peeling, pinholes and patchy texture. Most come from poor preparation, damp, or coats that are too thick or rushed.
- Hairline cracks: one thick coat or fast drying. Scrape, refill in thin coats.
- Peeling or flaking: damp, dust or loose old paint. Fix the water source, scrape and redo.
- Pinholes and bubbles: air trapped in the mix. Mix slowly, let it rest, press the coat firmly.
- Patchy texture: the edge dried before the next section. Work smaller areas, one person per wall.
- Dust build-up in grooves: deep pattern in a busy area. Dust often and repaint if stained.
If putty keeps flaking in the same spot, another coat will not help. Trace the leak or seepage first, using our guide to water seepage causes and solutions.
Should You Texture a Wall Yourself or Hire a Painter?
DIY suits small, simple designs such as stipple or tape stripes on one wall. Hire a trained painter for 3D, rustic or full-room work.
DIY
Small jobsGood for one accent wall in a simple pattern.
- Lowest cost, you pay for material only
- Stipple, comb and tape designs are learnable
- Uneven patches are common on first tries
- Redo work costs time and putty
Professional painter
RecommendedBest for 3D, rustic and large walls.
- Even pattern across the full wall
- Faster, with the right tools on site
- Can judge wall condition before starting
- Higher cost per sq ft
Before you hire, check these points:
- Photos or a site visit of past texture work
- A written quote per sq ft, with putty, primer and paint brands named
- Number of putty, primer and paint coats
- Who repairs cracks or damp before work starts
- Any workmanship warranty, in writing
How Do You Clean and Repaint a Textured Putty Wall?
Clean a textured putty wall with a soft brush or dry cloth, and wipe marks gently with a damp cloth. Avoid scrubbing pads and harsh cleaners, which wear down the peaks.
- Touch-ups: keep a little of the same paint for spot repairs.
- Small damage: refill with putty, re-tool to match the pattern, then prime and paint.
- Repainting: the pattern usually stays under new paint. Use a roller with a longer nap so paint reaches the grooves.
How Does Wall Putty Design Compare with Texture Paint, Wallpaper, Panels and POP?
Wall putty design is the most repairable textured option, and texture paint is the quickest. Wallpaper and 3D panels give exact patterns but handle damp poorly.
Wall putty design vs other decorative finishes
Qualitative comparison| Option | Moisture tolerance | Repairs | Best for |
|---|---|---|---|
| Wall putty design | Good with exterior or water-resistant putty | Easy patch and repaint | Custom accent walls |
| Texture paint | Depends on product | Patch with the same paint | Fast, even textures |
| Wallpaper | Poor on damp walls | Replace the panel or roll | Rentals, printed patterns |
| 3D wall panels | Varies by material | Replace the panel | Exact repeat patterns |
| POP work | Poor in damp areas | Skilled patching | Ceilings and cornices |
Quick picks by situation: a tight budget suits stipple on one wall, a rental suits wallpaper or a light texture, a humid wall suits cement putty, and a statement wall suits 3D work.
How Do You Plan Your Textured Wall?
Plan your wall putty design in three steps: pick the style, check the wall and choose the putty, then get a written quote.
Check the wall for cracks and damp first. Then measure the area and work out putty with the formula above.
Planning a textured wall?
Order putty, primer and paint with a GST invoice, delivered across Bengaluru.