On this page
- What Is Plastering Work and Why Does It Matter?
- Which Type of Plaster Should You Use?
- What Mix Ratio and Thickness Suit Each Location?
- How Do You Check Sand Before the Mason Starts?
- How Do You Prepare Brick, AAC and Concrete Surfaces?
- What Are the Stages of Plastering Work?
- Which Plaster Finishing Methods Can You Choose?
- How Long Should You Cure Plaster in Bengaluru Weather?
- How Much Does Plastering Work Cost per Sq Ft in India?
- How Do You Check Plastering Work Quality?
- How Should You Hire and Pay a Plastering Contractor?
- Plastering work protects walls and gives a level base for putty and paint.
- Use about 12 mm inside in one coat and 15–20 mm outside in two coats.
- Finish all conduits, pipes and frames before the mason starts.
- Cure for at least 7 days; wait about 28 days before putty.
- Tap the finished wall: a hollow sound means poor bond.
Plastering work is the job of covering brick, block or concrete walls with a thin layer of mortar, usually cement and sand, to make them level, hard and weather-resistant. On Indian sites a mason (mistri) and a helper do this work after the walls, electrical conduits, plumbing lines and door frames are in place, and before wall putty and paint.
What Is Plastering Work and Why Does It Matter?
Plastering work means applying mortar over a wall or ceiling to protect it and prepare it for finishing. In building construction, plaster does four jobs:
- Protects the masonry from rain, heat and moisture.
- Levels uneven brick and block joints.
- Finishes the wall with a hard, clean surface.
- Prepares a base that holds putty and paint.
Plaster levels the wall. Wall putty is a thin paste on top that fills fine pores before paint. Putty cannot correct a wall that the plaster left uneven.
Which Type of Plaster Should You Use?
Cement-sand plaster is the default for most Indian homes because it works inside, outside and in wet areas. Gypsum suits dry interior walls where speed and a smooth finish matter.
Main plaster types compared
Relative, not priced| Plaster type | Best for | Wet areas and exterior | Curing and finish |
|---|---|---|---|
| Cement-sand Default pick | Internal and external walls, ceilings | Yes | Needs 7 days of water curing, then putty |
| Gypsum Fast | Dry interior walls and ceilings | No: avoid bathrooms and outside walls | No water curing; very smooth, often no putty |
| Lime | Heritage and breathable walls | Limited | Slow to harden |
| Ready-mix (factory) | Large jobs, AAC block walls, machine spraying | Depends on product | Follow the maker's data sheet |
Both OPC 43 grade (Ordinary Portland Cement) and PPC (Portland Pozzolana Cement, blended with fly ash) are used for plaster. PPC gives a smoother, more workable mix but gains strength more slowly, so keep curing it the full period.
What Mix Ratio and Thickness Suit Each Location?
Most plastering work in India uses a cement-sand ratio between 1:4 and 1:6, per IS 1661 (the Indian code of practice for cement and cement-lime plaster finishes). Thickness depends on where the plaster goes.
Mix and thickness by location
IS 1661 and IS 2402 summaries| Location | Cement : sand | Thickness | Coats |
|---|---|---|---|
| Internal walls | 1:4 to 1:6 | About 12 mm | 1 |
| Ceilings | As specified; keep thin | About 6 mm | 1 |
| External walls Richer | Base 1:4 to 1:6, finish 1:3 to 1:4 | 15–20 mm | 2 |
| Bathrooms and wet walls | 1:4, often with a waterproofing admixture | About 12 mm | 1 |
Use a richer mix outside, where rain hits the wall, and a leaner mix inside. Avoid 1:3 or richer for general wall plaster: extra cement shrinks more and cracks.
How Do You Check Sand Before the Mason Starts?
Sand quality decides plaster quality, because silt and clay weaken the bond and cause shrinkage cracks. Run these checks on every new load:
- Jar silt test: fill a measuring cylinder to 50 ml with 1% salt water, add sand to 100 ml, top up with 50 ml more, shake and wait 3–4 hours.
- Read the result: silt layer ÷ sand layer × 100. Reject sand above about 8%.
- Rub test: rub damp sand between your palms; a muddy stain means too much clay.
- Sieve: pass plaster sand through a fine mesh to remove pebbles and lumps.
- Cement and water: use fresh, lump-free cement stored off the floor, and clean drinking-quality water.
M-sand (manufactured sand from crushed rock) is widely used around Bengaluru as river sand is scarce. Buy plastering-grade M-sand: it is finer and washed, unlike concrete-grade M-sand.
How Do You Prepare Brick, AAC and Concrete Surfaces?
Good surface preparation stops hollow plaster, the most common defect. Do these steps before any mortar goes on:
- Finish all conduit chasing, pipe work and door and window frame fixing.
- Clean off dust, oil and loose mortar with a wire brush.
- Rake brick and block joints about 10 mm deep so the plaster can key in.
- Wet red brick and fly ash brick walls the day before, and again just before plastering.
- On smooth RCC (reinforced cement concrete), hack the surface or throw a dash coat of rich cement-sand slurry, or brush on a bonding agent.
- On AAC (autoclaved aerated concrete) blocks, follow the block maker's guidance; most recommend a bonding coat or a polymer-modified ready-mix plaster.
- Fix 150 mm wide chicken mesh across every beam-wall and column-wall joint, nailed at 150 mm centres.
Brick and concrete expand, shrink and settle by different amounts. Plaster spanning the joint cracks along that line. The mesh spreads the strain across a wider strip.
What Are the Stages of Plastering Work?
Plastering work follows six stages: set guides, apply the base coat, level, float, apply the finish coat and trowel smooth. Each stage controls flatness or bond.
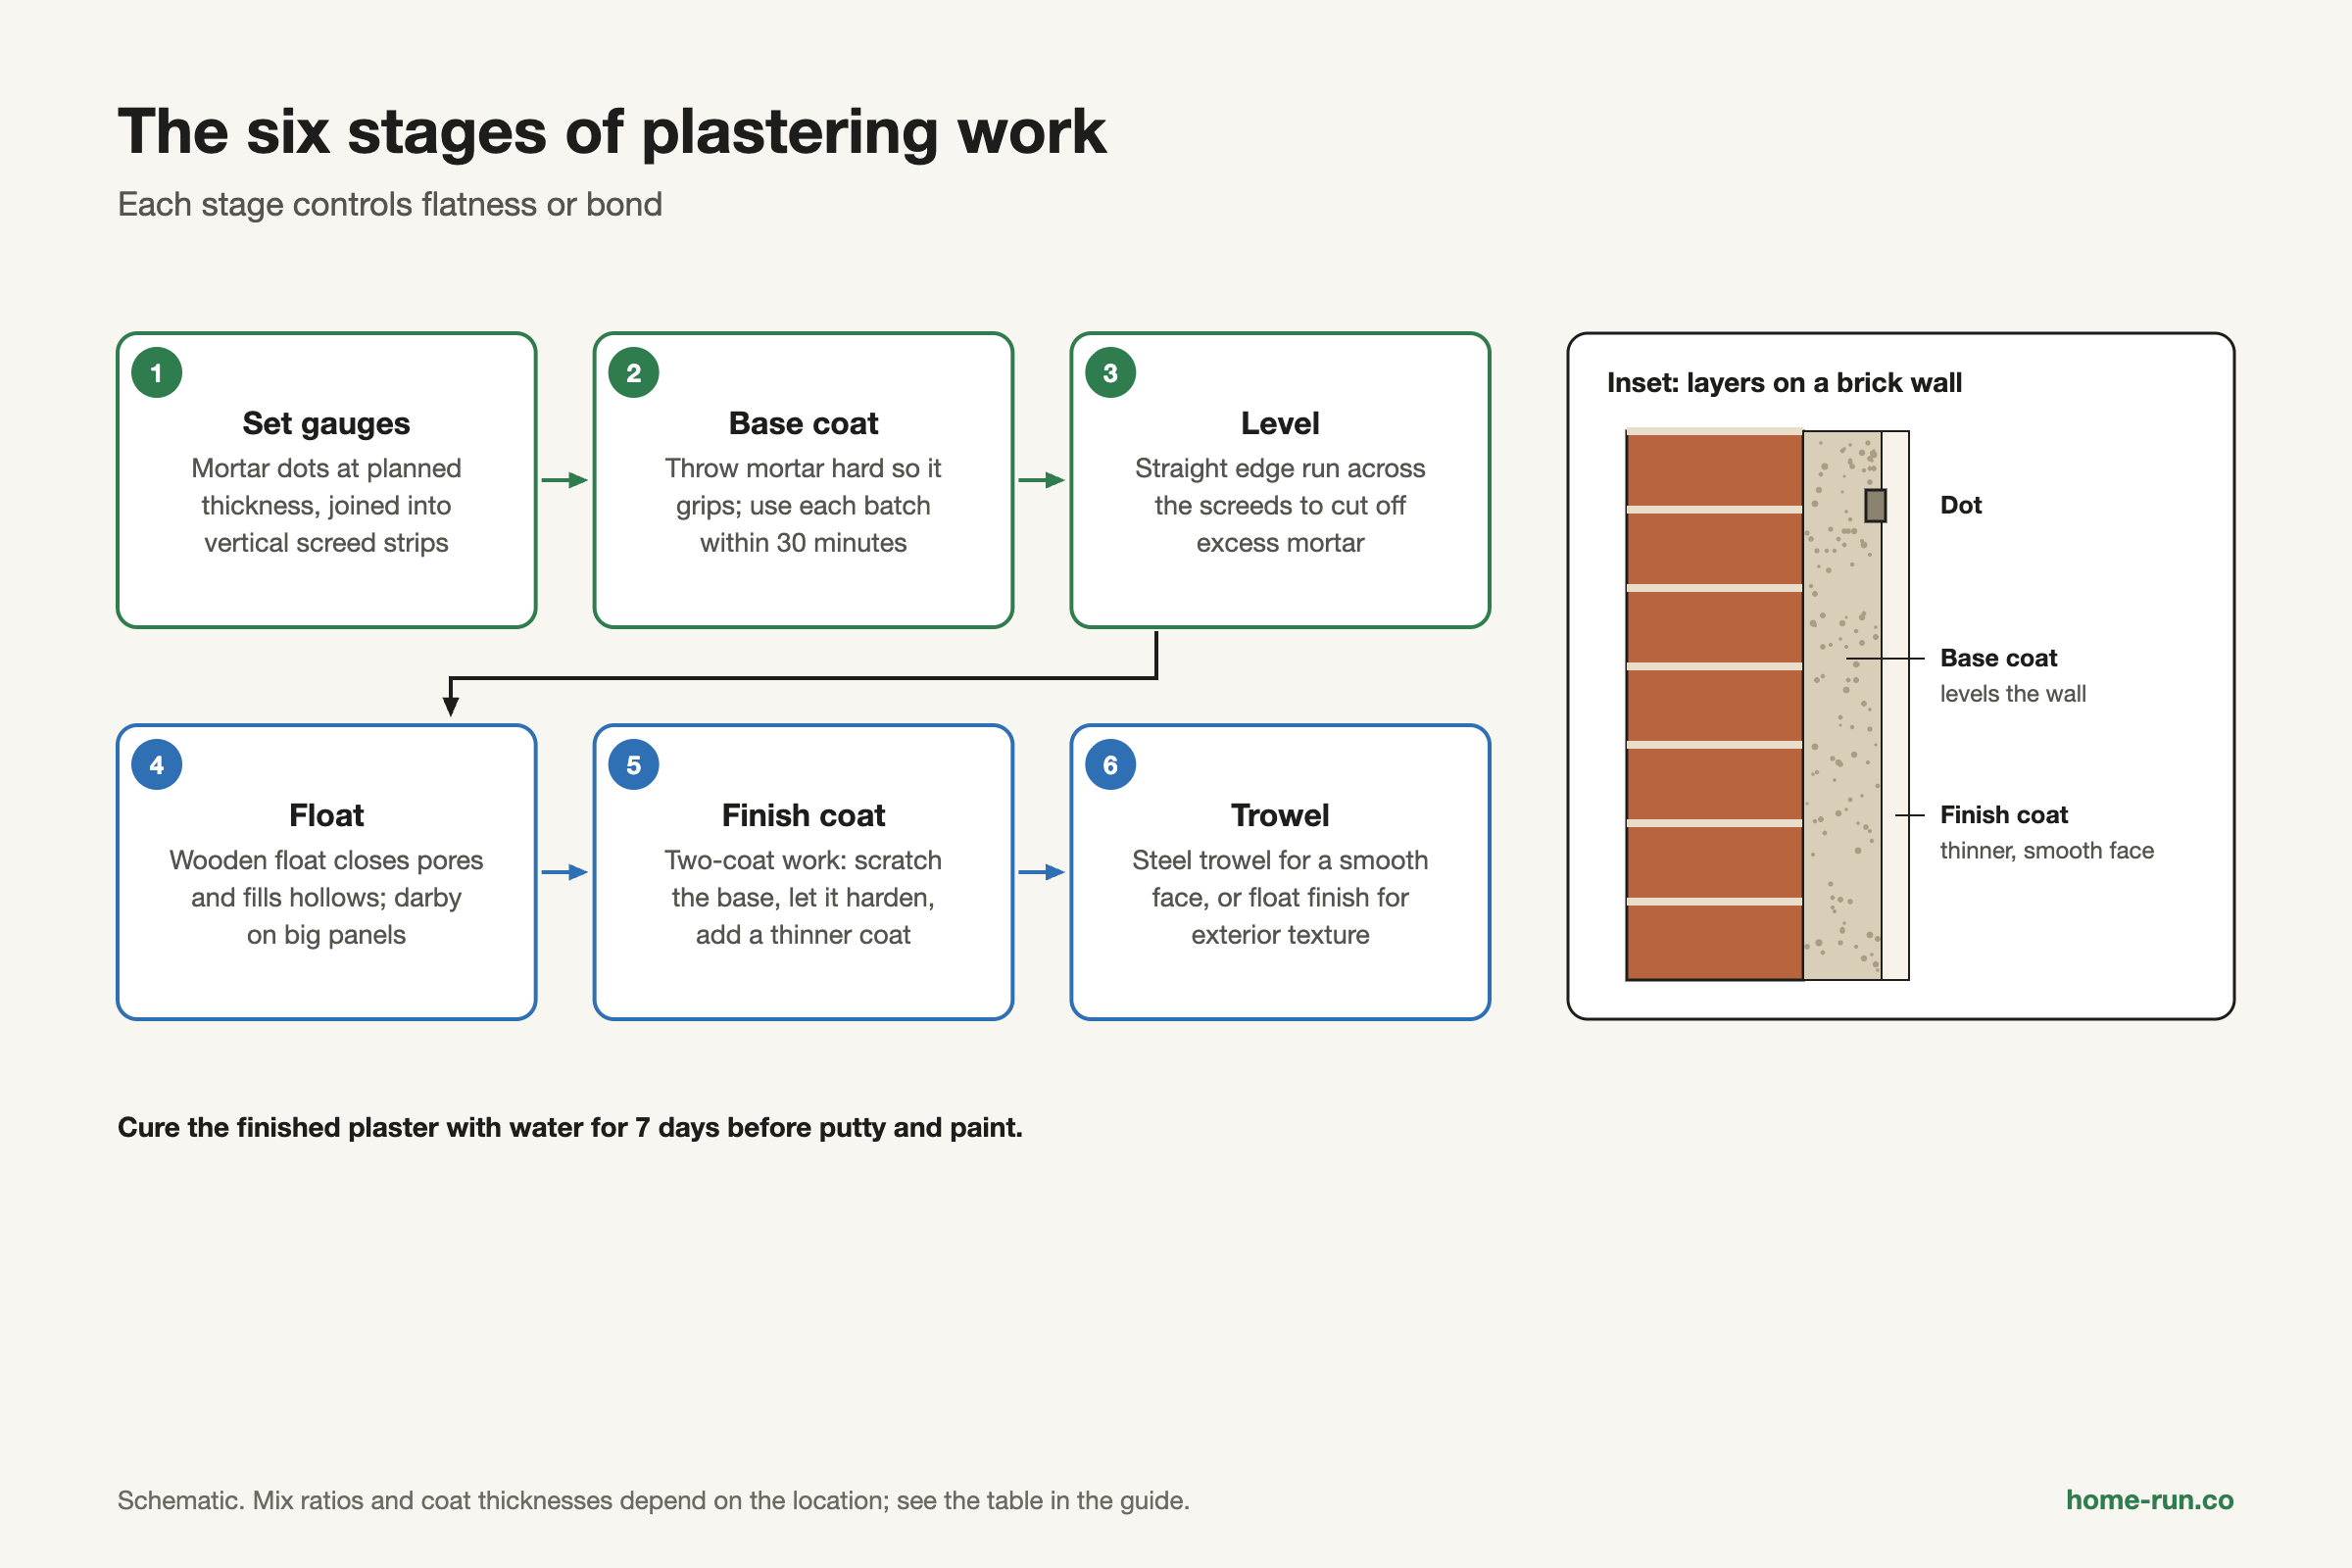
- Set gauges (dots and screeds). Fix small mortar dots at the planned thickness, checked with a plumb bob and a spirit level. Join them into vertical screed strips.
- Apply the base coat. Throw mortar hard onto the wall with a trowel so it grips. Use each batch within 30 minutes of adding water.
- Level with a straight edge. Run a straight edge (a long aluminium or wooden rule) up and down across the screeds to cut off excess.
- Float. Rub the surface with a wooden float to close pores and fill hollows. A darby (long float) helps on big panels.
- Apply the finish coat. On two-coat work, scratch the base coat, let it harden, then add the thinner finish coat.
- Trowel finish. Polish with a steel trowel for a smooth face, or leave a float finish for exterior texture.
Ceiling plastering
Plaster ceilings before walls so droppings do not spoil finished walls. Keep the coat thin, about 6 mm, so the plaster does not sag or fall. Wet the slab well first.
External plastering
External walls need secure scaffolding and two coats. One common specification uses an 18 mm total: a 12 mm base coat scratched about 2 mm deep, then a 6 mm finish coat. Form drip grooves under sunshades and window heads, and cut grooves at large panels and RCC-masonry joints to control cracks.
Which Plaster Finishing Methods Can You Choose?
The finishing method sets how the wall looks and how much putty it needs. Common plaster finishes in India:
- Smooth steel-trowel finish: the standard interior base for putty and paint.
- Neat cement punning: a thin neat cement wash trowelled on for a hard, smooth face, used on some interior walls.
- Sponge or float finish: slightly textured, common on exterior walls that take textured paint.
- Sand-faced finish: sand pressed into the final coat for a grainy exterior look.
- Rough cast and pebble dash: wet mortar or small stones thrown onto the final coat; durable on exposed walls.
Hand plastering
Most homesIndividual houses and repairs.
- Works with site-mixed cement-sand
- Easy to find skilled masons
- Slower on large wall areas
Machine plastering
FastApartments and large projects.
- Sprays factory ready-mix plaster
- Needs a trained crew and power
- Faster, more even thickness
How Long Should You Cure Plaster in Bengaluru Weather?
Start curing cement plaster about 24 hours after it is laid and keep it wet for at least 7 days. Hot, dry or windy days need more frequent wetting.
Plaster laid
Shade fresh work from direct sun and strong wind.
Curing starts
Spray water gently, without washing the surface.
Keep it damp
Wet the wall several times a day; more often in summer.
Let it dry and harden
Moisture leaves the wall; hairline cracks show up now if they will.
Ready for putty
Asian Paints recommends 28 days of curing for new masonry before wall putty.
Cover fresh external plaster before heavy rain. Painting a damp wall too early traps moisture and causes peeling and efflorescence (white salt deposits). Coastal sites need a richer mix and a waterproofing admixture.
If patches keep coming back damp after curing, read about the causes of wall dampness before you paint.
How Much Does Plastering Work Cost per Sq Ft in India?
Plastering work in India costs about ₹25–35 per sq ft for internal plaster and ₹30–45 per sq ft for external plaster, with material and labour (HouseYog, March 2026). Labour alone is about ₹12–18 per sq ft inside and ₹15–22 per sq ft outside.
Indicative plastering rates in India
₹ per sq ft of wall area, 2026| Work | Labour only | Labour + material |
|---|---|---|
| Internal, 12 mm | ₹12–18 | ₹25–35 |
| External, 15–20 mm | ₹15–22 | ₹30–45 |
Rates rise with height, scaffolding, thicker coats, ceiling work and small job size. Ask whether the quote is for labour only or includes cement, sand and curing water.
How Do You Check Plastering Work Quality?
Check plastering work with a tap test, a long straight edge and a plumb line before you pay the final bill.
- Tap the whole wall with a knuckle or coin: no hollow sound.
- Hold a straight edge of at least 2.5 m against the wall in several directions; gaps should stay within the tolerance in your contract.
- Walls are plumb and corners are square and straight.
- Thickness is even around switch boxes, frames and corners.
- No cracks, sand pockets or rough patches under side light.
- Curing was done every day for at least 7 days.
Common plaster defects, causes and repairs
Call a professional for large or damp areas| Defect | Likely cause | Repair |
|---|---|---|
| Hollow sound Fix first | Dry or dusty wall, no keying, thick single coat | Cut out, wet, re-plaster the patch |
| Hairline or map cracks | Rich mix, fast drying, poor curing | Fill with crack filler before putty |
| Cracks along beams | No mesh at brick-concrete joint | Cut a groove, fix mesh, re-plaster |
| Efflorescence | Salts carried by moisture | Stop the water source, brush dry, then treat |
| Popping or pitting | Lime lumps or impurities in sand | Dig out spots and patch |
| Peeling paint | Painted before plaster dried | Scrape, let dry, prime and repaint |
Some checklists allow about 3 mm under a 2 m straight edge; others allow up to 5 mm. Write the limit you want into the contract before work starts.
How Should You Hire and Pay a Plastering Contractor?
Choose a labour-only contract if you will buy and check materials yourself, and a labour-plus-material contract if you cannot supervise daily. Either way:
- Get a written scope: locations, mix, thickness, coats, finish and curing.
- Agree how area is measured, in sq ft or sq m, and how door and window openings are deducted.
- Pay in stages tied to inspected work, and hold the last part until the tap test passes.
- Insist on gloves, eye protection and secure scaffolding; wet cement burns skin.
In metro cities such as Bengaluru, a mason earns about ₹600–850 per day and a helper ₹400–550 per day (Aecord, 2026). How much area that pays for depends on height, coats and finish.
Starting plastering work?
Cement, sand and plastering tools delivered across Bengaluru.