On this page
- Choose living room tiles in order: measure, material, size, finish, colour, specs, samples.
- For floors, pick vitrified tiles with water absorption of 0.5% or less; keep ceramic for walls.
- Match tile size to the room and plan the layout so the edges do not end in thin slivers.
- Buy 10% extra for a straight lay and 15% for diagonal or herringbone, all from one batch.
- Fix tiles of 600 mm and above with a Type 3 (C2) tile adhesive, not a thick cement-sand bed.
To select living room tiles, decide where they go, then choose the material, size, finish and colour in that order, and check the box specs before you buy. This guide walks through each decision. For design ideas and colour pairings, see our gallery of living room floor tiles.
How Do You Select Living Room Tiles Step by Step?
You select living room tiles in seven steps, each narrowing the options before you reach the showroom.
Step 1: Measure the floor and walls
Measure the length and width of the floor in feet and multiply them to get the area in sq ft. For a wall, multiply its width by the height you plan to tile, and subtract doors and windows.
Note the main door, balcony door and longest wall to plan where cut tiles fall. Also note daylight and traffic: a room that opens onto a balcony or entrance carries grit and water.
Step 2: Pick the right tile material
For a living room floor, vitrified tiles are the default choice, because their low water absorption makes them hard and stain-resistant. Ceramic tiles suit walls, and natural stone suits buyers who accept more upkeep.
Living room tile materials compared
Water absorption groups as per IS 15622 / ISO 13006| Material | Water absorption | Best for | Upkeep |
|---|---|---|---|
| Vitrified (GVT, PGVT, double charge) Default pick | 0.5% or less (BIa) | Living room floors | Low; mop with mild cleaner |
| Porcelain | 0.5% or less (BIa) | Floors, large wall slabs | Low |
| Glazed ceramic Budget | 3–10% (BIIa, BIIb); wall tiles above 10% (BIII) | Accent and half walls | Low on walls; chips on busy floors |
| Marble and natural stone Premium | Varies by stone | Statement floors | High; needs sealing and polishing |
In India, "vitrified" and "porcelain" often describe the same low-absorption body. Judge the tile by its stated water absorption group, not its label. Read more in our guide to porcelain tiles.
For a greener choice, ask about recycled content and prefer locally made tiles to cut transport.
Step 3: Match tile size to the room
Tile size should scale with the room. Bigger tiles mean fewer grout lines, which makes a floor look wider.
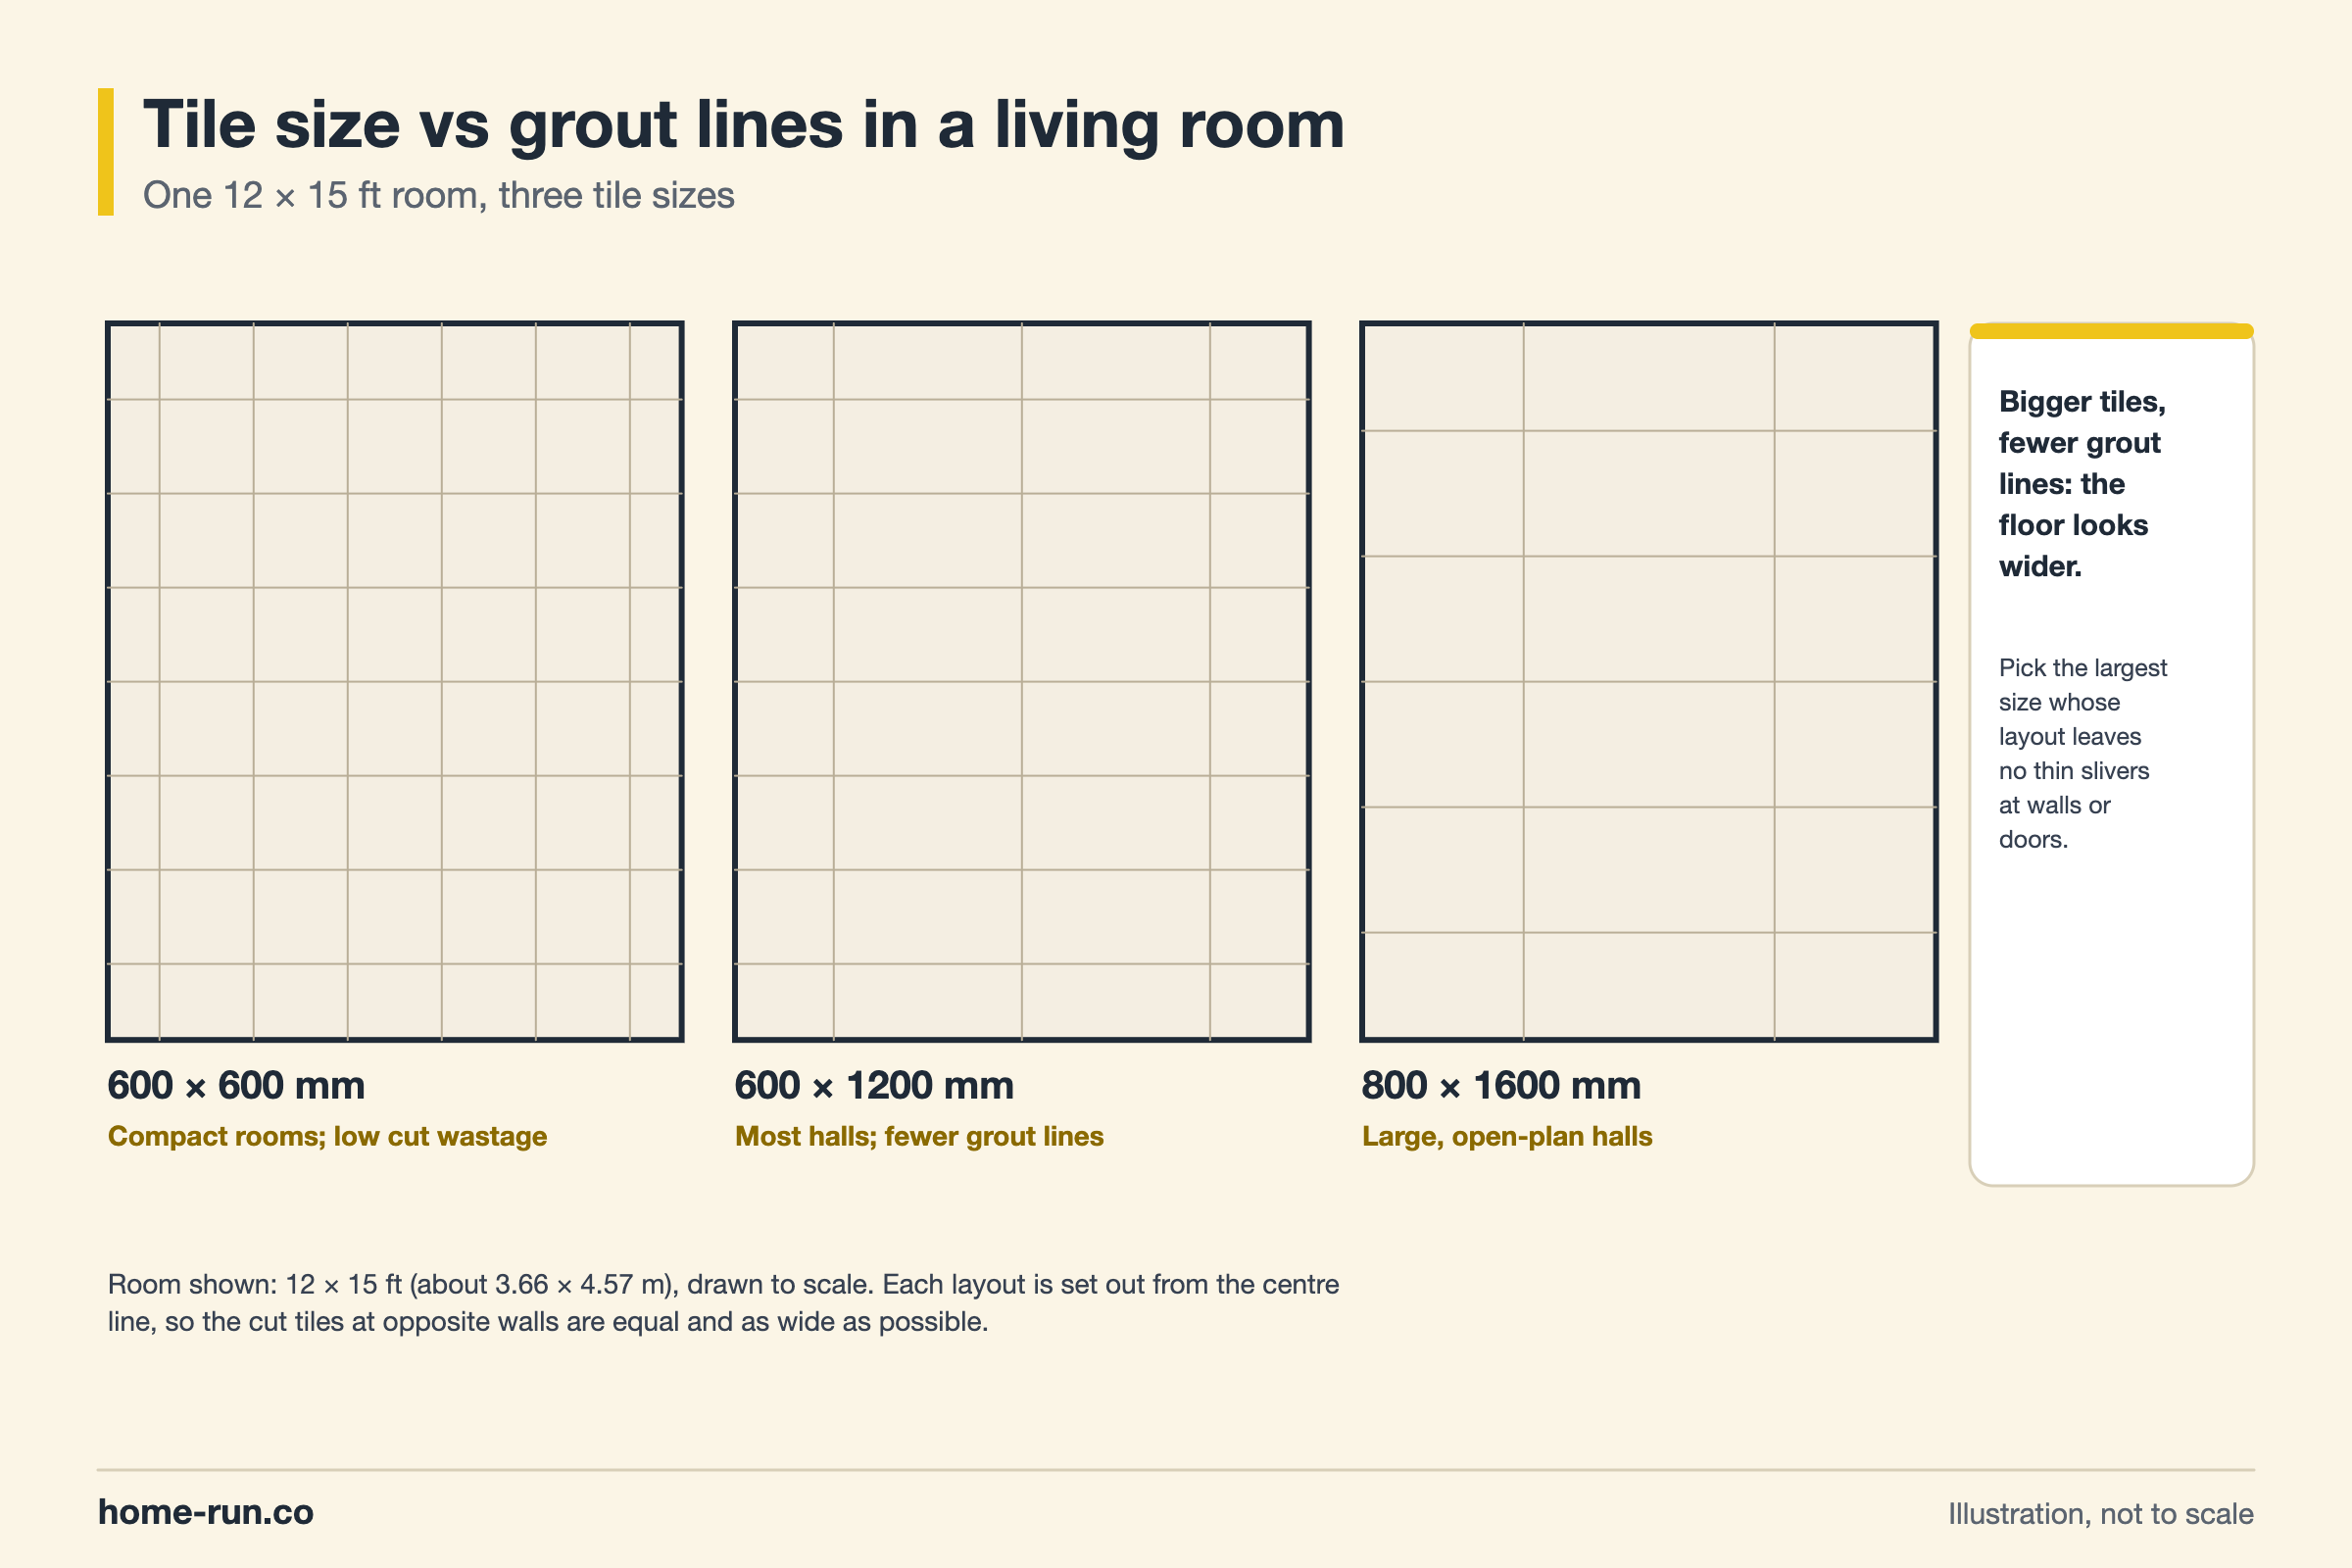
- Compact living rooms: 600x600 mm keeps cuts and wastage low.
- Large or open-plan halls: 600x1200 mm, 800x1600 mm or 1200x2400 mm slabs.
- Walls: 300x600 mm for regular walls, 600x1200 mm for a TV or feature wall.
Pick the largest size whose layout leaves no thin slivers at the walls or doorways. Narrow edge cuts cancel the clean look that large tiles promise.
Step 4: Choose the finish
Matt or satin finishes suit most living room floors, because they hide scratches and grip better underfoot. Glossy finishes reflect light and brighten a room, so they work well on walls.
Living room tile finishes compared
Pick by surface and traffic| Finish | Look | Grip and wear | Best place |
|---|---|---|---|
| Matt Default pick | Soft, natural | Better grip; hides scratches and dust | Floors near entrances and balconies |
| Satin | Low sheen | Middle ground | Most living room floors |
| Glossy or polished Slippery when wet | Mirror-like, bright | Shows water marks and scratches | Walls and low-traffic floors |
DCOF, or dynamic coefficient of friction, measures how slippery a tile is when you walk on it. A wet DCOF of 0.42 or more is the benchmark for level indoor floors that sometimes get wet, such as entry areas. Ask the dealer, since many Indian catalogues omit it.
Step 5: Choose a colour for the light you have
Light colours such as beige, ivory and light grey make a small or dim living room feel larger. Darker or strongly veined tiles suit large, bright rooms, where they add depth without closing the space in.
Match the undertone to your decor: warm tiles with wood, cool greys with white or black.
Step 6: Check the box and the batch
Check the box specs before you pay, because look-alike tiles can perform very differently.
- Water absorption group: BIa (0.5% or less) for floors
- PEI abrasion class 3 or higher for floors; PEI 3 covers all residential areas
- One shade and batch number on every box, so colour matches across the room
- Rectified edges if you want thin grout joints (the edges are machine-ground square)
- No chipped corners or warped tiles in an opened box
Step 7: Test samples at home
Lay two or three sample tiles on your floor and view them in morning light, evening light and under your own lamps. Showroom lighting flatters most tiles.
How Much Should You Budget for Living Room Tiles?
Budget about ₹120–220 per sq ft for vitrified living room tiles in Bengaluru, installed with adhesive and grout, according to Studio Matrx's June 2026 cost guide. Ceramic costs less and double-charged vitrified costs more.
Installed tile cost in Bengaluru (2026)
Material, laying, adhesive, grout and GST, per sq ft| Tile type | Typical grade | ₹ per sq ft |
|---|---|---|
| Ceramic Budget | Standard glazed | ₹70–120 |
| Vitrified (GVT, PGVT) Default pick | 600x600 or 800x800 mm | ₹120–220 |
| Double-charged vitrified | Heavy-duty | ₹150–260 |
Buying exactly the area you measured leaves no spares for cuts and breakage. A later top-up order rarely matches the first batch's shade.
Should You Lay Living Room Tiles Yourself or Hire a Professional?
Hire a professional tiler for living room floors, especially with tiles of 600 mm and above. DIY suits a small accent wall with light ceramic tiles.
Do it yourself
Small wall jobsPoint
- Saves the ₹35–55 per sq ft laying charge
- Workable for light 300x600 mm wall tiles
- Uneven joints and hollow spots are common
- Large slabs need two people and special tools
Hire a professional
RecommendedPoint
- Plans the layout so cuts fall at the edges
- Has tile cutters and levelling clips for slabs
- Keeps the floor level and edges flush
- Can give a written quote and fix defects
How Do You Plan Living Room Tile Installation?
Plan installation by preparing a level, dry base, choosing the adhesive and agreeing the layout with your tiler.
- Check the base. The floor must be level, clean and dry. A new floor may need a screed, a thin levelling layer of cement mortar.
- Pick the adhesive. Use a Type 3 (C2) tile adhesive under IS 15477, the Indian standard for tile adhesives, for tiles of 600 mm and above. A thick cement-sand bed risks hollow tiles with large vitrified slabs.
- Agree the layout. Mark the starting line from the main door or the room's centre so cut tiles fall under furniture or along the walls.
- Choose the grout. Match grout colour to the tile. Epoxy grout resists stains better than cement grout.
- Finish the edges. Order matching skirting tiles with the floor tiles so the batch matches.
Tiling your living room?
Tiles, tile adhesive and grout delivered across Bengaluru.