On this page
- What Is the Slump Value of Concrete?
- Why Is the Slump Test Important?
- What Equipment Does the Slump Cone Test Need?
- How Do You Do a Slump Test, Step by Step?
- What Do True, Shear and Collapse Slump Mean?
- What Slump Value of Concrete Does IS 456 Recommend?
- How Does the Slump Test Compare With Other Workability Tests?
- What Factors Affect the Slump Value of Concrete?
- How Do You Adjust Slump on Site Without Losing Strength?
- How Do You Use Slump Results to Get Better Concrete?
- The slump value is how far fresh concrete drops, in mm, once the 300 mm slump cone is lifted.
- IS 456:2000 sets slump by placing condition, not by grade: 25–75 mm for lightly reinforced work, 50–100 mm for heavily reinforced work.
- Run the test to IS 1199 (Part 2):2018: three layers, 25 strokes each, one steady vertical lift of the cone, all within 150 s.
- Only a true slump is a valid reading. A shear or collapse means you repeat the test.
- Raise slump with a plasticizer or a redesigned mix, never with extra water alone.
The slump value of concrete is the vertical drop, in millimetres, of a cone of fresh concrete after the mould is lifted away. It is the quickest site check of workability, meaning how easily the concrete can be placed and compacted.
A low slump means a stiff mix. A high slump means a wetter, more flowing mix. This guide covers the IS code ranges, the test itself and what to do when the reading is off.
What Is the Slump Value of Concrete?
The slump value of concrete is the difference between the cone height (300 mm) and the height of the highest point of the slumped concrete. If the concrete settles to 225 mm, the slump is 75 mm.
Slump measures consistency, the wetness or stiffness of the mix. Engineers use it as a stand-in for workability, which IS 456:2000, the Indian code for plain and reinforced concrete, says must suit the placing conditions.
- Workability: how easily concrete is mixed, carried, placed and compacted without separating.
- Consistency: the stiffness of the fresh mix, which the slump value expresses in mm.
- Units: Indian standards report slump in mm, to the nearest 5 mm.
A slump reading says nothing direct about compressive strength. Two M20 mixes can show the same slump with very different strength if one got its slump from extra water and the other from a plasticizer.
Why Is the Slump Test Important?
The slump test is important because it catches a wrong batch before it goes into the formwork. A reading takes about three minutes and needs only a cone, a rod and a tape.
- Quality control: each truck or batch is compared with the slump in the order or mix design.
- Batch consistency: a sudden jump in slump usually means extra water or a batching error.
- Right mix for the job: pumped or congested sections need more slump than a mass footing.
- Delivery acceptance: IS 4926:2003, the code for ready-mixed concrete, lets delivered slump vary by ±25 mm or ±one-third of the specified value, whichever is less.
What Equipment Does the Slump Cone Test Need?
The slump cone test needs a metal cone mould, a steel tamping rod, a rigid non-absorbent base and a measuring scale. IS 1199 (Part 2):2018, the BIS method for consistency of fresh concrete, fixes the sizes below. ASTM C143, the US method, uses the same 12 × 8 × 4 inch cone.
Slump test equipment checklist
- Slump cone: metal at least 1.6 mm thick, 200 ± 2 mm base, 100 ± 2 mm top, 300 ± 2 mm high.
- Tamping rod: steel, 16 ± 1 mm diameter, 600 ± 5 mm long, rounded ends.
- Base plate: flat, level, rigid and non-absorbent, dampened before use.
- Scale or tape: to read the drop to the nearest 5 mm.
- Scoop, trowel and a fresh sample: taken from the middle of the discharge, not the first or last bit.
IS 1199 (Part 2):2018 revised the consistency tests of the older IS 1199:1959. IS 456:2000 points to IS 1199 for the method, so site labs now follow the 2018 part.
How Do You Do a Slump Test, Step by Step?
You do a slump test by filling the cone in three tamped layers, lifting it straight up, and measuring how far the concrete drops. The steps below follow IS 1199 (Part 2):2018.
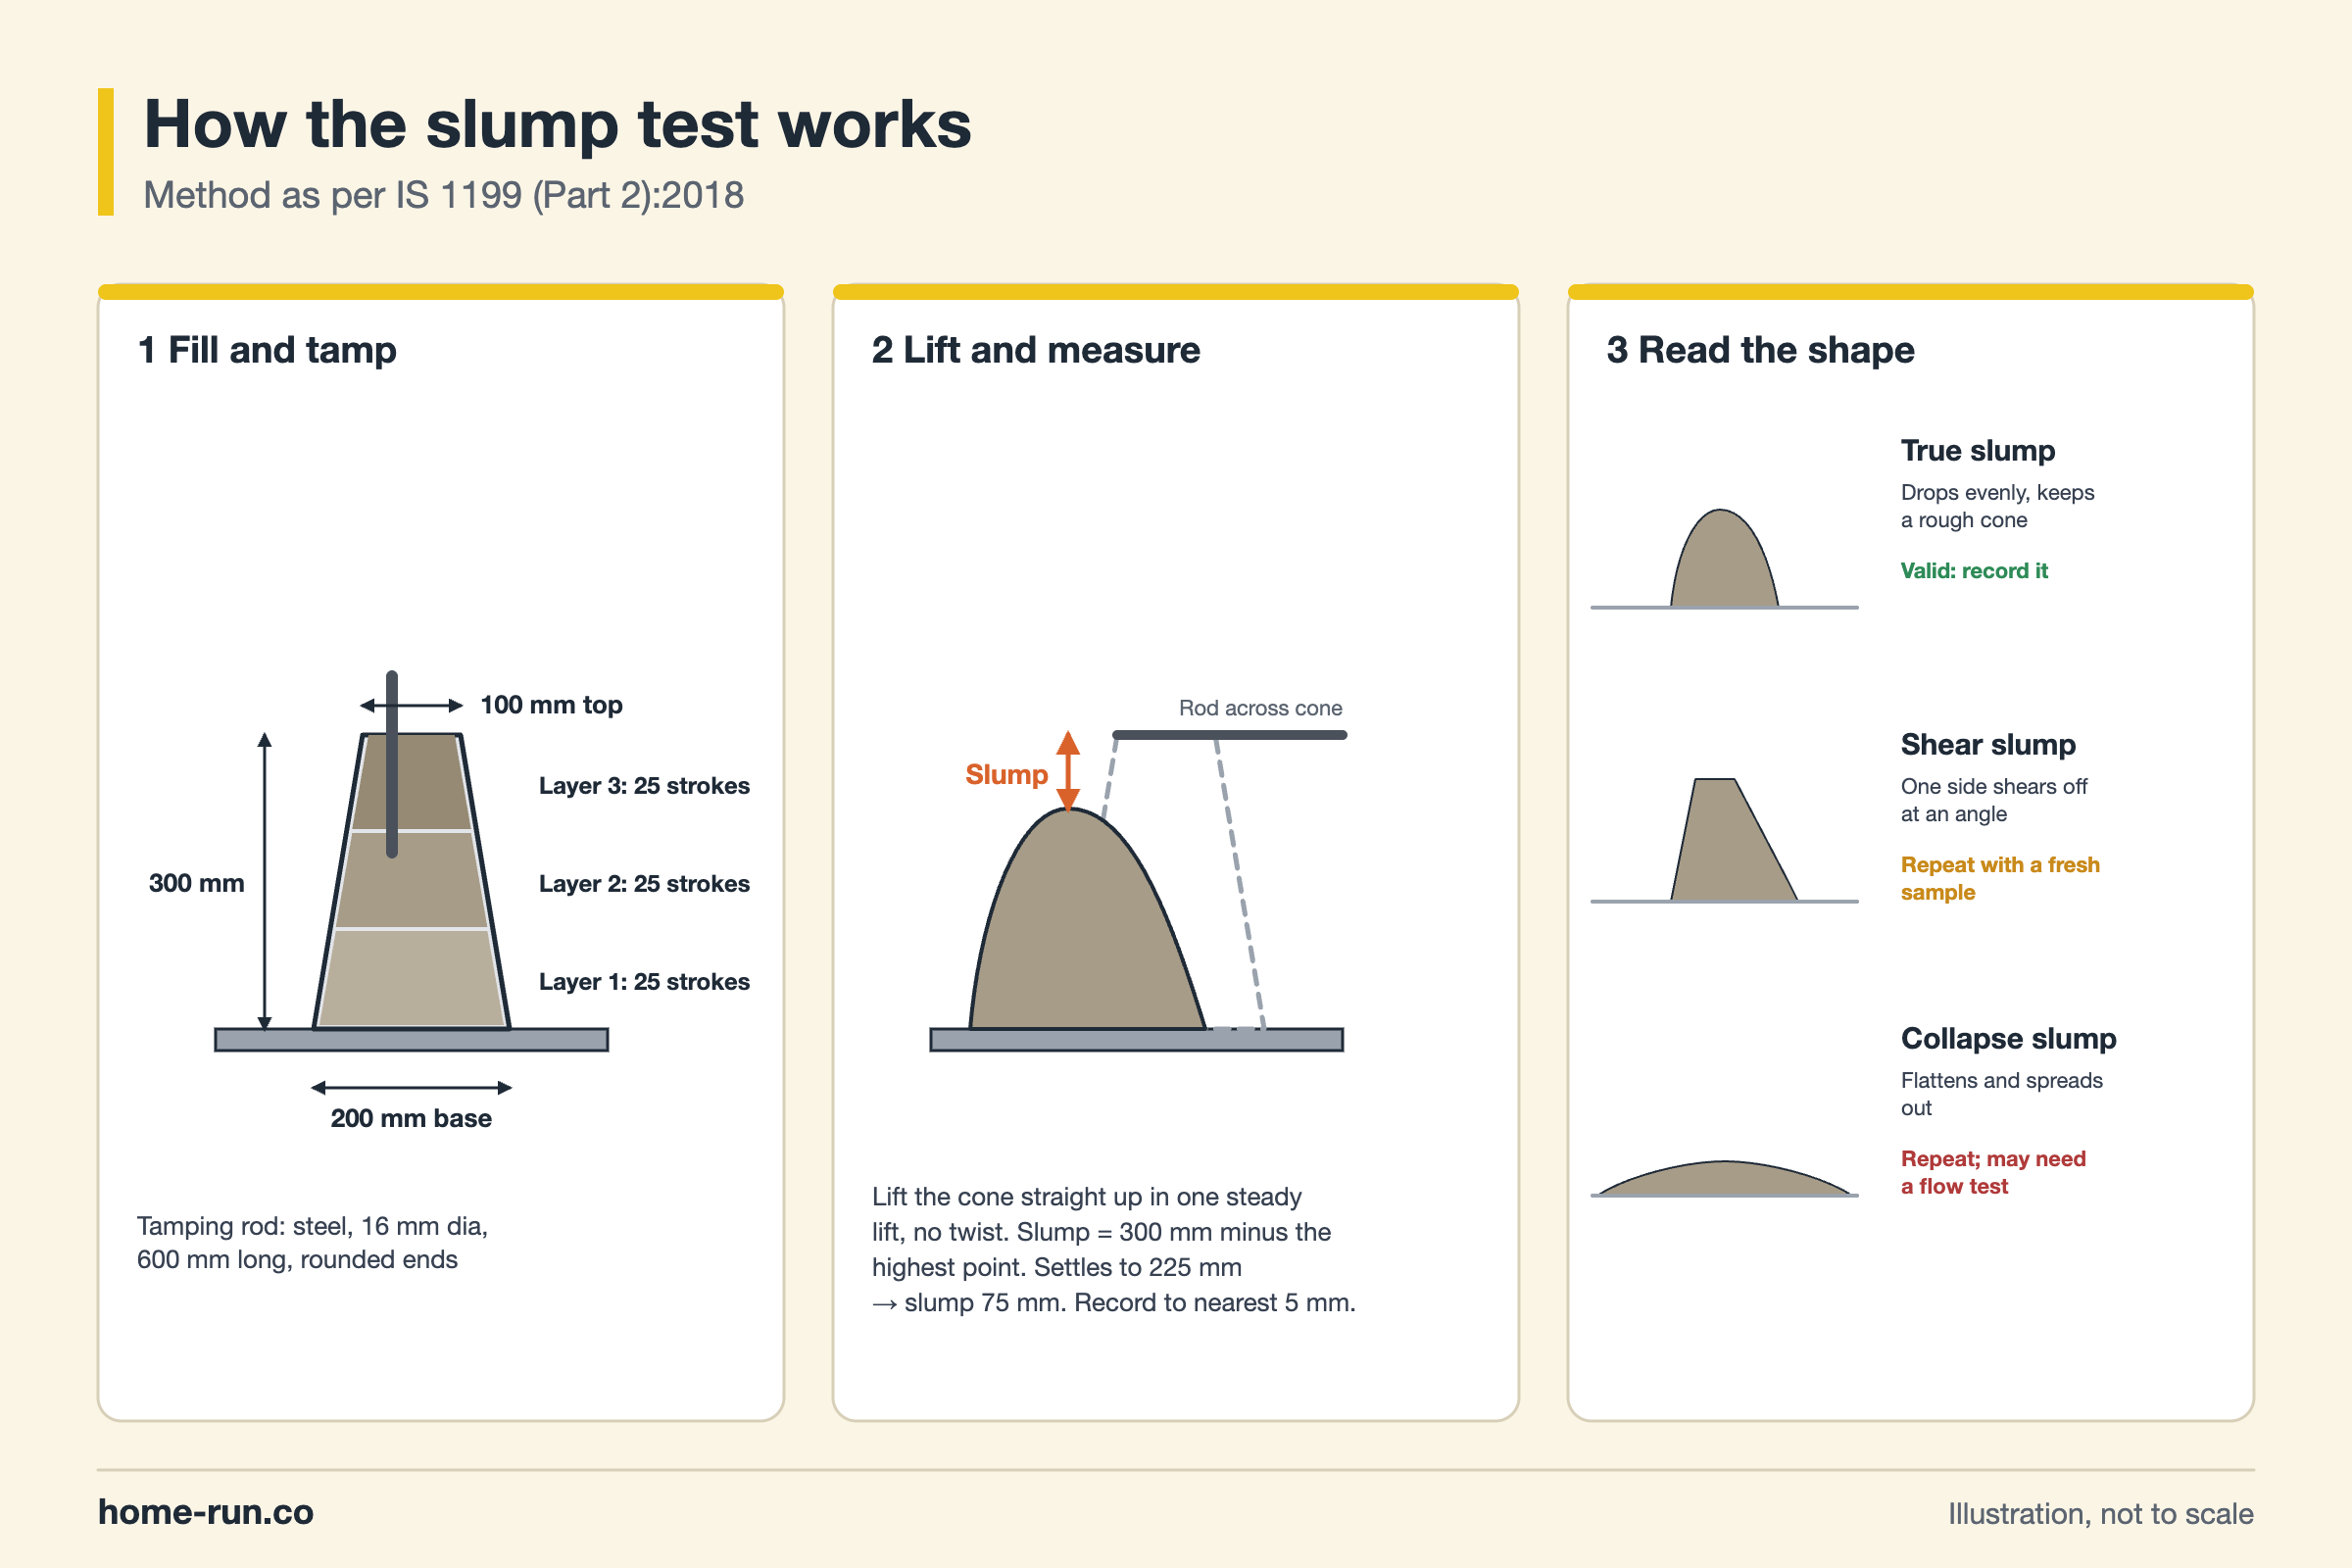
- Prepare the cone. Clean and dampen the inside of the cone and the base. Place the cone on the base, narrow end up.
- Hold it down. Stand on the foot pieces, or clamp the cone, so it cannot lift while filling.
- Fill the first layer. Fill about one-third of the height and tamp 25 strokes spread evenly over the area.
- Fill the second and third layers. Tamp each with 25 strokes, just reaching into the layer below. Keep the top layer heaped above the rim.
- Strike off. Level the top with the rod in a rolling action and clean spilled concrete from around the base.
- Lift the cone. Raise it straight up in one steady lift, with no twist or sideways push.
- Measure at once. Lay the rod across the upturned cone. Measure from the rod down to the highest point of the concrete.
- Record the result. Note the slump to the nearest 5 mm and the slump shape. Finish the whole test within 150 seconds of starting to fill.
Most wrong readings come from a dry or tilted base, a cone lifted with a twist, or a sample left standing in the sun. Test within minutes of sampling, and on a level base in shade on hot Bengaluru afternoons, when slump drops fast.
What Do True, Shear and Collapse Slump Mean?
True, shear and collapse slump are the three shapes concrete takes after the cone is lifted, and only a true slump gives a valid slump value of concrete.
Types of slump and what they mean
Read the shape before the number| Slump type | What it looks like | What it tells you |
|---|---|---|
| True slump Valid | Concrete drops evenly and keeps a rough cone shape | Cohesive mix; record the reading |
| Shear slump Repeat | One side shears off and slides down at an angle | Lack of cohesion, often a harsh or lean mix |
| Collapse slump Repeat | Concrete flattens and spreads out | Too wet, or a flowing mix that needs a flow test |
Self-compacting concrete (SCC) and many superplasticized mixes are designed to collapse. For these, measure slump flow, the spread diameter, under IS 1199 (Part 6). SCC typically targets about 550–750 mm of spread.
What Slump Value of Concrete Does IS 456 Recommend?
IS 456:2000 recommends a slump of 25–75 mm for lightly reinforced work, 50–100 mm for heavily reinforced sections and 100–150 mm for trench fill and in-situ piles. The values come from clause 7.1, which ties workability to placing conditions.
Slump value as per IS 456:2000, clause 7.1
Slump in mm| Placing condition | Degree of workability | Slump (mm) |
|---|---|---|
| Blinding concrete, shallow sections, pavements laid with pavers | Very low | Compacting factor 0.75–0.80 |
| Mass concrete; lightly reinforced slabs, beams, walls, columns; floors; hand-placed pavements; canal lining; strip footings | Low | 25–75 |
| Heavily reinforced slabs, beams, walls, columns | Medium | 50–100 |
| Slipform work, pumped concrete Pumping | Medium | 75–100 |
| Trench fill, in-situ piling | High | 100–150 |
| Tremie concrete | Very high | Use a flow test |
IS 456 has no separate slump for M20, M25 or M30 concrete. An M20 roof slab with normal steel falls in the 25–75 mm band. The same M20 pumped up three floors needs 75–100 mm. Pick the grade from our concrete mix ratio guide, then pick the slump from this table.
For an M20 concrete mix placed by hand in a lightly reinforced slab, a target inside 25–75 mm fits the code. Write the target slump on the order so every truck is tested against it.
How Does the Slump Test Compare With Other Workability Tests?
The slump test suits most site concrete, but stiff and very fluid mixes need a different test. IS 1199 (Part 2):2018 limits the slump test to slumps of 10–210 mm.
Slump test
Site defaultPoint
- Range: 10–210 mm of slump
- Kit: cone, rod and base, no power needed
- Time: under 3 minutes per test
- Best for: footings, slabs, beams, columns
Other consistency tests
Special mixesPoint
- Vee Bee: 5–30 seconds, for stiff mixes
- Compacting factor: for very low workability
- Flow table: 340–620 mm, mostly in the lab
- Slump flow: for SCC, under IS 1199 (Part 6)
What Factors Affect the Slump Value of Concrete?
The slump value of concrete depends mostly on water content, then on admixtures, aggregates, temperature and time since mixing.
- Water content and water-cement ratio: more water per cubic metre raises slump and lowers strength. Our water-cement ratio guide explains the trade-off.
- Admixtures: plasticizers raise slump without extra water. Superplasticizers, or high-range water reducers, do the same much more strongly.
- Aggregate shape and size: rounded aggregate gives more slump than angular crushed stone. Larger aggregate needs less water for the same slump.
- Fines and sand grading: very fine or dusty sand soaks up water and stiffens the mix.
- Temperature: heat speeds evaporation and setting, so slump drops faster on hot days.
- Time: slump falls as cement hydrates. IS 4926:2003 asks for truck-mixed concrete to be discharged within 2 hours of loading.
IS 10262:2019, the BIS mix design code, starts at 186 kg of water per m³ for 20 mm angular aggregate at 25–50 mm slump. It adds about 3% water for every extra 25 mm of slump.
How Do You Adjust Slump on Site Without Losing Strength?
You adjust slump on site by adding a plasticizer or by adding water and cement together, keeping the water-cement ratio fixed. Adding water alone raises slump but weakens the concrete.
- Slump too low: add an approved dose of plasticizer or superplasticizer and remix. IS 4926:2003 allows an extra admixture dose at site only by agreement between supplier and buyer.
- Slump too high: do not pour a sloppy mix. Reject the truck, or let the batch stiffen only if the engineer approves and it stays within the 2-hour limit.
- Repeat problem: ask for the mix to be redesigned for the target slump, not fixed truck by truck.
- Record changes: IS 4926 requires any water or admixture added at your request to be noted on the delivery ticket and signed.
The numbers show why "just add water" fails. Water alone moves the ratio from 0.50 to 0.53, which cuts strength. A plasticizer usually gets the same slump with no extra water or cement. If you are pumping, see how a concrete pump works and what it needs from the mix.
Mixing concrete on site?
Cement, sand, aggregates and steel delivered across Bengaluru.
How Do You Use Slump Results to Get Better Concrete?
You use slump results by fixing a target slump for each pour, testing every batch against it, and changing the mix when readings drift. Slump is a check on consistency, so pair it with cube tests for strength.
- Write the target slump and tolerance on the purchase order for each element.
- Log slump, time, truck number and weather for every load.
- Cast cubes from the same sample when the slump is recorded.
- Review the log after each pour and correct the mix design, not the truck.